The best backpacking stove is a moving target — an imaginary golden hare that’s faster than a car and speaks a dozen languages fluently. Really, the “best” backpacking stove doesn’t exist.
As with most outdoor gear, the “best” depends on your environment, your budget, and your personal inclinations. That said, there are many excellent backpacking stoves. In order to get to the bottom of what may be the best for you, we have compiled a comprehensive guide that gets to the heart of the backpacking stove market. It deals with types of stoves, fuels, and features.
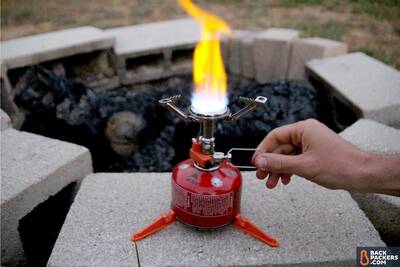
Whether you want to cook gourmet pizza in the Rockies or boil water as fast as humanly possible under a snowbank — there’s a stove for you.
Navigate this guide with our handy Table of Contents. Or read the whole thing. Your call.
Table of Contents:
- Backpacking Stoves vs. Camping Stoves
- Stove Types
- Fuel Types
- Stove and Fuel Efficiency
- Boil Time
- Features
Backpacking Stoves vs. Camping Stoves
The first and most important delineation in the outdoor stove realm comes down to activity — are you backpacking or car camping?
Backpacking is when you set foot into the wilderness with a backpack that holds everything you need to survive. Backpacking gear is often lighter weight, smaller, and more specific — backpacking stoves follow suit.
Most backpacking stoves are a single burner, weigh very little, take up almost no room, and thrive at boiling water.
Camping, also called car camping, means you drive up to your campsite, park your car, pitch a tent nearby, and hang for the weekend. The gear for camping in often heavier, bulkier, and more deluxe than backpacking, and stoves are no different.
Most camping stoves have two burners, sit on top of a table, use propane, and work equally well at boiling water and making an omelette.
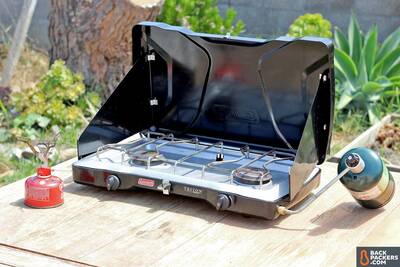
On the left in red is a small backpacking stove, the MSR PocketRocket 2. Taking up most of the image is the Coleman Triton, a standard-sized camping stove. Size matters.
Backpacking Stove Types
Within the realm of backpacking there are six major types of stoves you can choose from. You should have no problem frying up a handful of eggs or a roiling a cauldron of water with these stoves. Each has their place, and it’s important to know what kind of backpacker you are before picking out your stove.
Let’s dive in.
Small Canister Stove
The most common type of stove, and the one you’ll likely see in your buddy’s backpack, is a small canister stove. Named for the small canister of isobutane fuel that these stoves screw into, this stove is basically the epitome of modern-day backcountry cooking.
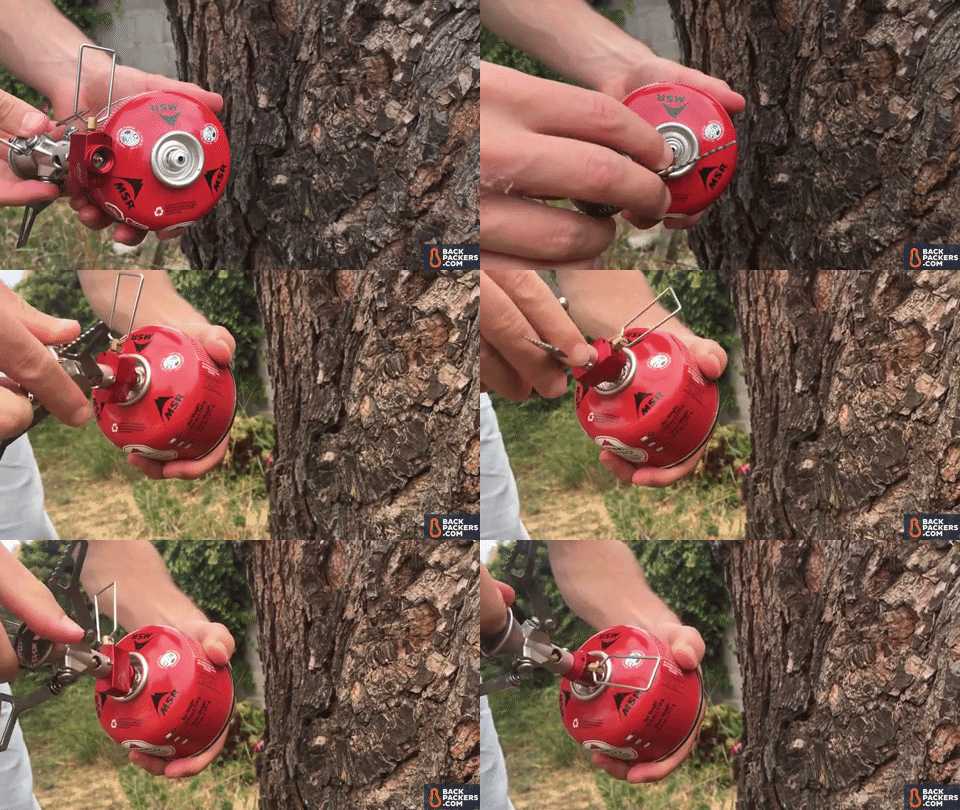
Most backpacking small canister stoves use a Lindal valve and screw directly into the fuel can.
The best use-cases for a small canister stove is a small group, usually 1-3 people. This group will mostly be boiling water for freeze-dried or dehydrated meals, oatmeal, and coffee/tea. While legitimate cooking is possible with some small canister stoves, it’s not the norm, mostly due to pot size and stability, rather than simmer.
They are so lightweight and simple that you’ll often end up in the backcountry to find that multiple people have brought them — the more stoves the better! To a point, anyway.
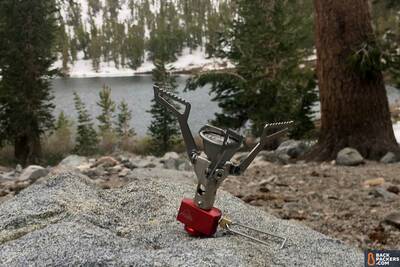
The MSR PocketRocket 2 is the epitome of a small canister stove. It’s tiny.
Pros
- Small and lightweight: Small canister stoves are typically eight ounces or less these days, with many in the three ounce range. They fold into themselves to create tiny packed sizes and come with a carrying case.
- Plug and play: There is relatively no learning to be done with a small canister stove. Screw it into a canister, unfold the arms, twist the release valve, and put a match or lighter to the stove.
- Fast Boil Times: Most small canister stoves can boil a liter of water in four minutes at low elevation. It doesn’t get much better in the backcountry.
- Adjustable: Small canister stoves have a single valve that can be rotated easily. This controls the flame. Many can simmer well, too.
- No spills: The isobutane canister are not liquid, so you can’t spill anything (except for your meal!)
Cons
- Not Stable: It depends on the model, but when compared to other stove types, small canister stoves are not very stable. They sit on the fuel canister and depend on its size for their base.
- Not meant for large pots: Small canister stoves typically have small arms, so large pots can’t rest easily on them. Make sure you have a pot or pan that is an appropriate size for your stove.
- Poor wind resistance: For most situations small canister stoves are fine in the wind. But if you’re in a gale they will probably blow out. You can’t use a windscreen with them because it traps the heat near the fuel source, which can cause explosions. Don’t do this!
- Not repairable: Small canister stoves don’t typically malfunction or break, but if they do you’re out of luck. You can’t repair a canister stove in the field, so you’ll have to eat cold beans until you get home.
Integrated Canister Stove
Integrated canister stoves are the cool new kid in school. They sauntered in with super fast boil times, a full cook system, and fancy heat rings. You’ll see these in physical retail stores like REI, mostly because they look cool when set up.
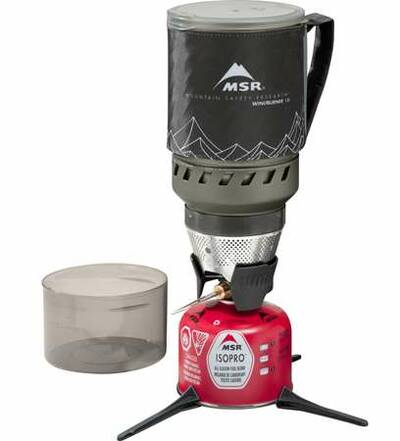
Here’s the MSR WindBurner, an integrated canister stove with a windscreen, a heat exchanger, a stabilizer, a custom-made pot/cup, and a bowl. Everything nests into itself for easy transport.
Integrated canister stoves combine the stove and cup into one streamlined system. Jetboil was the first to do this, and they did it incredibly well. Now MSR and a few others have joined the fray, each with a competing and similar array of products.
You might find an integrated canister stove in your backpacking troop. They’re either bought by backpackers who want to buy one item that has everything they need (rather than a separate pot/pan), or those who are serious about boiling water in a streamlined fashion.
Integrated canister stoves have many of the same pros and cons of the small canister stove, with a few exceptions:
Pros
- Boil Time: Boil time jumps up a notch on integrated canister stoves. Because the stove has a specific heat exchanger and radiant burner that screws into the stove, the water can boil faster. (Note: This really depends on the stove and your environment. We’ve found small canister stoves and integrated canister stoves to be fairly close in actual use).
- Fuel Efficiency: Integrated canister stoves have better fuel efficiency. Again due to the heat exchanger, which needs less fuel to boil water in the same (or less) time.
- Wind resistance: Most integrated canister stoves have a built-in windscreen that sits above the fuel source. This makes them great in windy environments, or at times when you’re worried about the weather.
- All-in-one: Many consumers end up with these stoves not because they’re “better”, but because they come with everything you need. Rather than buying the stove and pot separately, you have to buy a integrated canister stove with pot or cup. This also means it nests into itself perfectly.
Cons
- More expensive: You pay for the extra hardware, specialized concept, and fancy heat exchanger.
- Heavier: If small canister stoves are the most stripped-down a stove can possibly be, integrated canister stoves are elaborate units that have every little thing you might need. They are fairly heavy, and all the extras make them more noticeable in your pack.
- Unstable: The integrated canister stove setup is like a skyscraper: expensive, fancy, and very tall. While they do a good job keeping wind from knocking out the flame, they are so tall that they’re wobbly. A careless hand can push over the whole stove setup easily, which spoils the meal and is sketchy.
- Don’t Cook Real Food: Integrated canister stoves were created to boil water quickly. They aren’t known for being able to cook full meals in the backcountry, which typically requires a stove that can simmer.
Remote Canister Stoves
Remote canister stoves are the less-talked-about cousin in the canister stove family. They offer a slight change on a model you’re now super familiar with.
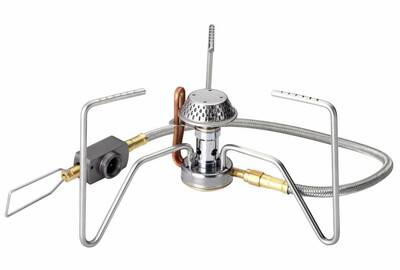
The Kovea Spider is a classic remote canister stove. It sits on the ground, its legs collapse, and the hose allows for a canister to sit far away.
In essence, a remote canister stove adds a fuel line to the small canister stove. This allows the remote canister stove to sit flat on the ground by itself and keep the fuel away from the stove.
These aren’t common in most backcountry setups, though this author thinks they should be. They are often a little heavier and more expensive than small canister stoves, and don’t offer the same appeal as integrated canister stoves. Yet they have a purpose!
The three main benefits of the remote canister stove are:
- Super Stable: Remote canister stoves are built to sit directly on the ground. Find a flat surface and it’ll be hard to knock over, especially because they’re low to the ground.
- Wind Blocker: Because the fuel canister is nowhere near the actual stove, you can use a traditional windscreen on remote canister stoves.
- Best in Cold Weather: The reason remote canister stoves were created is for use in freezing conditions. When isobutane is in cold weather the gas doesn’t heat up as quickly, creating a subpar flame and potentially no boiling water. With remote canister stoves you can invert the isobutane can, creating a liquid stove on the fly. Not all remote canister stoves do this (they need to have a fuel line that runs through the flame), so make sure to inquire if the one you’re buying is able to be inverted.
- Great for cooking. Stability, wind protection, and use in cold weather all means that these stoves are great for real cooking. They often have wider bases, too, so you can use frying pans in addition to pots.
Liquid Fuel Stoves
If you wanted to get into the history of backpacking stoves, you’d start with liquid fuel. Liquid fuel is a generic term that includes white gas, kerosene, diesel, unleaded gasoline, and even jet fuel. Basically any common fuel that you can burn.
The oldest white gas stove is the Svea 123, which debuted in 1953 in Sweden, and is now sold by Optimus. A number of years later the the MSR Whisperlite came along. Both models are tried and true and virtually unchanged to this day. As with anything that goes back to the 80’s, there are aspects of liquid fuel stoves that have been outpaced by modern technology. Most of these fall into the “cons” category of liquid fuel stoves.
However, there are plenty of standout features that make liquid stove stoves a staple. You’ll find one in old-school backpacker arsenals, in expedition and outdoor guide setups for long treks, and in the packs of some alpine explorers.
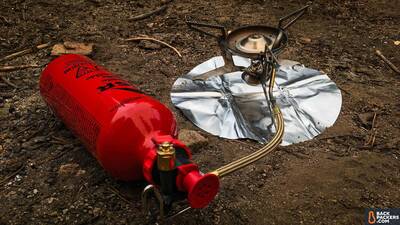
Liquid fuel stoves like the MSR Whisperlite typically come with heat reflector, windscreen (not pictured), fuel line, and the stove itself. The fuel bottle is necessary, and is a secondary purchase.
In appearance they look a lot like remote canister stoves, and are best when used with their included windscreens and heat reflectors.
Note: Not all liquid fuel stoves run every type of liquid fuel. The heavier fuels, like diesel and paraffin, may not work with the model you have. Using incorrect fuel in a stove can have dire consequences, so please read through the specific fuels your stove can handle.
Pros
- Field Repairable: The best aspect of liquid fuel stoves is that they’re repairable in the field. You can take them completely apart, clear clogs, and then put them back together, all in the backcountry. No other stove can do this, and it makes these perfect for those who are on extended treks or leading groups for many weeks or months of the year.
- Many Fuel Types: If you’re used to isobutane cans, this may not seem important. But there are other types of fuel, most of which are way cheaper than isobutane. You can buy white gas from most camp stores, and even diesel from gas stations. This gives you flexibility in what you want to burn. There are also nicer stoves that work with both liquid fuel and isobutane canisters, truly giving you the best of both worlds.
- International: Due to the multiple fuel types, liquid fuel stoves are best for international travel. You never know exactly what’s available in other countries, and these stoves assure you’ll be able to burn something. That said, if they reek or have remnants of fuel in them, they will be confiscated by airlines, who are very anti flammable liquids (as they should be.) Make sure to thoroughly clean your stove before flights.
- Fuel Efficient: The most noticeable aspect of the liquid stove on a daily use basis is how fuel efficient they are. You simply don’t go through as much fuel as a canister stove, which saves you money and weight in the long run.
- Simmer: Old models (like the Whisperlite) are not the best at simmering. But there are fancy new liquid fuel stoves, like the MSR Dragonfly or Primus OmniLite line, that were built to simmer. These are used on extended backcountry treks for gourmet meals.
Cons
- Heavy, many pieces: If you’re used to a small canister stove that takes up less room than your headlamp, a liquid fuel stove is going to feel like a lot of stuff. The stove itself is large and heavy, it comes with a heat reflector, windscreen, hose, and small parts for cleaning. Then there’s the bottle and pressure regulator, which are separate items to store and carry. It’s too much for some people.
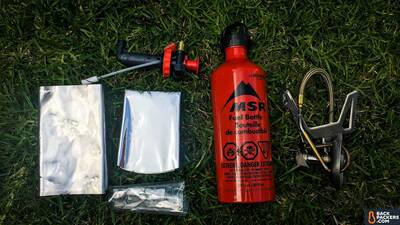
To put into perspective just how many pieces, here is the full MSR Whisperlite International kit.
- Slow boil times: If you get a high-end model that’s made to roar, your boil times will be comparable to a small or integrated canister stove. But for the most part liquid fuel systems are slower at boiling water, and you have to use the heat reflector and windscreen to achieve those times.
- Simmer: We put simmer in the cons as well. Old liquid fuel stoves are not known for their simmer. They start up with a roar, and either go to high or off. Best for boiling water or melting snow.
- Loud. Often equated to a “jet engine”, liquid fuel stoves have a habit of roaring. This has been mitigated in recent models, or with sound dampeners, but it’s worth noting.
- Steep learning curve: The biggest issue with liquid fuel stoves is their learning curve. You have to prime the stove before use, which means correctly attaching the hose to the fuel bottle, letting in fuel to the stove area, lighting it, letting it burn off, and (finally) cooking. It takes about five minutes to do all this — more if you’re not skilled at it. If you’re a liquid fuel pro you can do this without thinking, but for those who have never tried, it will take some time to get right.
Alcohol Stoves
In the backpacking realm an alcohol stove is about the simplest stove around. Popularized by Andrew Skurka, the DIY Fancy Feast stove is a prime example. Alcohol stoves use a combination of air holes, a flat surface, and denatured alcohol to boil water.
This stove is popular with ultralight backpackers (or other minimalists) because it contains no moving parts, can’t really break, and weighs under two ounces (most of the time). It also costs relatively nothing, unless you want to buy a fancy titanium alcohol stove (like the one in that video).
While we don’t recommend alcohol stoves for casual backpackers, they find a happy home in ultralight backpacker setups or thru-hikers that are going hundreds of miles at a time.
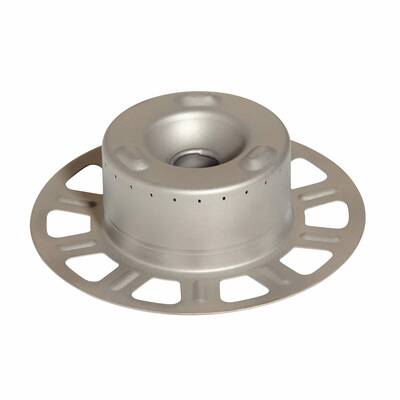
The Vargo Decagon is well-made titanium alcohol stove, if you don’t want to go the DIY route.
Pros
- Cheap, DIY: You can make an alcohol stove with a can of cat food, which costs roughly $1. It’s hard to get cheaper than that. For those that love DIY projects, this stove may be a winner.
- Don’t Break: With no moving parts or fuel lines it’s not easy for an alcohol stove to break. Unless you step on it, or it gets crushed. In that sense it’s very easy to render useless. But you can just create another one!
- Ultralight: This is the lightest stove you can carry when it comes to the stove and the fuel for a single person. The stove itself isn’t more than an ounce or two, and denatured alcohol can be measured out (like liquid fuel) so you only take the weight you need, as opposed to isobutane.
Cons
- Poor flame control: You pour the alcohol into the stove and light it — that’s it. There is way to increase the temperature if you want to boil water faster. Some alcohol stoves, like the Trangia stoves, can use a another piece that allows a simmer. You could also build something to make your alcohol stove simmer, but it’s not the same as twisting a valve.
- Poor boil time: Due to the lack of flame control, you don’t get a very fast boil on alcohol stoves. It’s still under 10 minutes as long as your pot is the right size for the stove, but it’s not going to be fast.
- Single Fuel Use: You have to wait until all the alcohol in the stove has burned off before moving on. With use you’ll learn to pour the right amount for what you need, but once you’ve made your bed you’ll have to sleep in it (as the saying goes). Note: This is only true for some alcohol stoves. You can blow some of them out and pour excess fuel back into your bottle.
- Bad in inclement weather: As you can maybe tell from the DIY-nature of this stove, it’s not the best in rain or wind. Yes, you can use a windscreen that’s very light. You can also create or buy supplemental items to help it perform better, but those will probably end up costing and weighing about as much as a canister stove. At that point, what is the point? We’re pretty sure it’s DIY and ultralight pride!
- Not always safe: If you’re not careful, you may start a brush fire with your alcohol stove. This really depends on the user (obviously), but you can’t just put these stoves out with a click, so be aware of brush in your area. Clear the ground where you plan to use the stove, and have a dampener handy.
Wood-Burning and Solid Fuel Stoves
We’ve come to everyone’s “favorite” type of stove, despite the fact that almost nobody uses this type of stove. Wood-burning stoves are about as hipster as dark wood coffee tables. Companies like BioLite have capitalized on this, toting the pure power of wood! No need to carry your fuel, it’s right out there in the wild!
These stoves use either wood or chemical fuel (like Esbit) to create fire. The stoves themselves are a house to hold that fire. They are created with various ventilated designs so as to hold your pot while also burning the wood or chemical fuel efficiently. There are a ton of these designs on the market, yet the general consensus is they make way less sense than canister stoves for most people.
To each their own, though.
Pros
- Fuel weighs nothing (or almost nothing): The only significant pro of the wood or solid-burning stove is how light the fuel is. If you’re truly finding wood along the way, then you don’t ever need to carry the 8-16 ounces of fuel you’d normally have to. If you’re using Esbit, it’s lighter than any liquid fuel or canister. The stove itself can be heavy or light, depending.
Cons
- No flame control: This issue is the same as alcohol stoves. You don’t have much control of your flame, so trying to get a faster boil or simmer isn’t really possible. You could always put in more wood for a “bigger” flame, but that really depends on your stove’s parameters.
- Bad Smell for Chemicals: While Esbit is lightweight and fairly efficient, it doesn’t smell good. When cooking it’s fine, but it smells pretty disgusting as is. You’ll want to put in a seriously sealed Ziplock, and far away from your food.
- Can’t Find Wood: If you’re hell-bent on cooking with wood, make sure you have access to it. This matters more locationally than anything. Also, think about if you can find dry wood that’s ready to burn the moment you pick it up.
- Fire Restrictions: In some wilderness areas you’ll see warning signs that say “Canister Stoves” are fine, but no open fires. A wood-burning stove counts as an open fire.
Backpacking Fuel Types
If you’ve read through all the Stove Types, a number of Fuel Types were mentioned. It’s hard to talk about stoves without mentioning fuel because, well, nothing gets lit without it.
It’s important to know what fuel your stove uses, what fuel you want to use, and where to get that fuel. We break down the different types of backpacking fuel below.
Isobutane
Isobutane is the most popular backpacking fuel today. It is used by all canister stoves — in fact, canister stoves get their name specifically from the isobutane canisters one sees gleaming on the shelves of REI and Big 5.
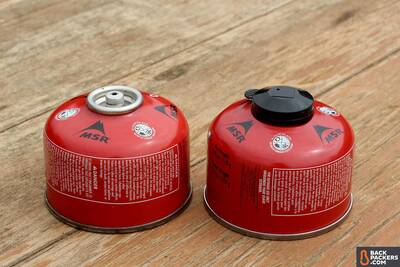
Two 4 oz. MSR isobutane canisters. Other stove brands make these, too.
You can typically purchase isobutane canisters in four, eight, and 16 ounce containers. The larger the container the heavier it is, but you’ll also have a sturdier base if your canister stove screws directly into the top.
The two most well-known manufacturers of Isobutane are MSR and Jetboil, but almost every company that makes a canister stove also makes canister fuel. There are slight variations in performance, but for most people it doesn’t matter at all. The threads are the same on all canisters (that we’re aware of), and they use the Lindal valve.
Where to find Isobutane: Most places won’t ship pressurized fuel without a large cost, so it’s best to go into your nearest brick and mortar outdoor store. REI, Big 5, Eastern Mountain Sports, and any stores like them will carry isobutane canisters.
Cost: Isobutane canisters are the most expensive of all the fuels types (besides jet fuel, maybe, but that’s an outlier!). The largest can you can buy is 16 ounces, and that’ll cost you roughly $10, depending on the brand. It’s nearly double the cost of White Gas or Denatured Alcohol when compared ounce for ounce.
Liquid Fuel (White Gas, Kerosene, Jet Fuel Diesel, Unleaded Gasoline)
As mentioned above, liquid fuel stoves derive their name from these liquid-state fuels. The liquid is not pressurized, and you can fill up a bottle just like you would fill up a car at the gas station. (You can also literally fill up your fuel container at the gas station if you want.)
You will want a special fuel container for liquid fuel. The most prevalent are the MSR Fuel Bottles, but other brands make them, too. Some stoves come with an included bottle, others require a secondary purchase.
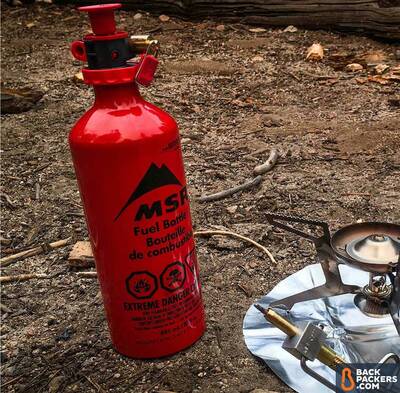
White Gas
White Gas is the most common liquid fuel around. Most stove brands create some version of white gas. The most popular is Coleman Camp Fuel, which can be found at hardware stores and some outdoor stores. Higher-end white gas is sold by MSR and Jetboil, and claims to be “cleaner” than other types.
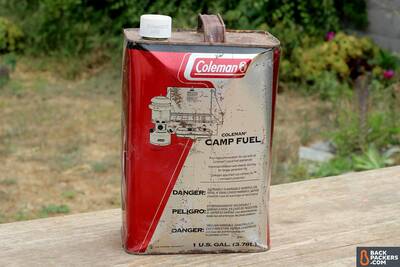
An old can of Coleman Camp Fuel, or white gas. This no longer has fuel in it, and is pretty rusty. We recommend buying the plastic containers when possible, unless you go through a lot of fuel.
White gas is the cleanest burning fuel for liquid fuel stoves, and what we (and others) recommend if you have access.
Cost: You can find one liter (32 ounces) of white gas for $7, but the quality won’t be very good. For higher-end brands and blends, you’re looking at $12-$25 for one liter, depending on where you buy it.
Kerosene, Diesel, Jet Fuel, Unleaded Auto Gasoline
We won’t go into detail about all of these other liquid fuel types. In short — they work, as long as your stove says it can handle that fuel type. You can bring a bottle filled with any of the fuels your stove allows into the wilderness, prime your liquid fuel stove, and get to cooking.
The drawback is that all of these fuels are dirtier than white gas and have a habit of getting your stove clogged. This means more frequent cleaning sessions, which get pretty annoying after the third or fourth go around. Out of all of these, unleaded auto gasoline is the worst in terms of cleanliness. It’s novel to fill up your fuel bottle right after your car, but we don’t really recommend it.
If your stove doesn’t actually process heavier fuel you’ll have more dangerous results than just a clog, so please check what fuels your stove (or the stove you’re looking at) is capable of using.
Denatured Alcohol
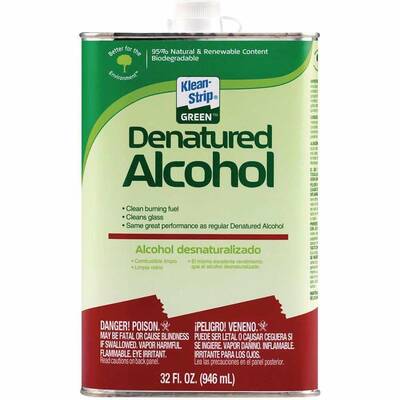 Denatured alcohol is used in alcohol stoves. It’s also used in many other things, most of which have nothing to do with backpacking. Luckily for outdoor folk, this fuel is available just about everywhere. Outdoor stores, hardware stores, sometimes even gas stations.
Availability is its main feature. Denatured alcohol is also known for how cheap it is. Also, you only take the amount you need into the wilderness. Once you get that measurement down, you have saved weight, cost, and effort. The fuel bottle doesn’t have to be fancy, either — a simple plastic bottle with a cap is all you need.
Finally, denatured alcohol is arguably the most “environmentally friendly” fuel. White gas and other liquid fuels have to be highly refined, a process that creates toxic by-products. The same is true of isobutane and solid fuel tablets.
Cost: You can get one liter (32 ounces) of Alcohol Stove Fuel for roughly $8. If you buy in bulk you can go cheaper.
Solid Fuel (Esbit)
For the extreme ultralight backpacker, there’s always a nice, light, tiny solid fuel source. It’s called Esbit. Esbit tabs look like little pieces of white chocolate which, once set to fire, burn on their own for a specific amount of time.
Esbit is ultralight. Each tab weighs .5 ounces, generates roughly 10-12 minutes of heat, and does not liquefy when burning. You can light it quickly with a match, then it burns on its own. It works as a fire starter in addition to fuel source. You can put multiple cubes together for a larger or longer burn, and boil water pretty easily (if slowly). It has a shelf life of 10 years and can be blown out once you’re done with the fire, then re-lit later on.
The major downsides are its smell. It doesn’t smell when burning, but by itself, sitting in your pack, it smells like old shrimp or fish. Yeah. We warned you. Put Esbit in a separate ziplock or vacuum seal them. They also leave some residue on your stove, so you’ll need to wipe that away.
These are great backups for any adventurer, and bringing at least one cube is smart (if you can stand the smell). For serious ultralight backpackers who don’t want to use denatured alcohol, this is a good choice for boiling water.
Cost: Esbit Solid Fuel Tablets cost roughly $8 for twelve tablets. This isn’t necessarily cheaper than other fuel types, depending on how much you need to use.
Wood
The final fuel source is the original one. We won’t go into this deeply. Just know that if you plan to use wood as your fuel source, you better know your environment and you better have a back-up. Wood may not be readily available, it may be damp, and it may not come in the size or quantity you need.
Always bring a secondary fuel source if you plan to use a wood-burning stove. Esbit is probably the best choice, as you can put it exactly where you would put the wood in your stove.
Backpacking Stove and Fuel Efficiency
One of the biggest topics in the stoving world is stove and fuel efficiency. What stove is most efficient, what fuel is most efficient, and what other tricks can you use to further improve the life of your fuel and the speed of your cooking?
This concept doesn’t matter much to the overnight backpacker, who typically has a small canister stove, an 8 ounce canister, and the knowledge that they’ll be alright. But the moment you decide to head out for more than three nights, or when you have a large group of people, fuel efficiency becomes immediately relevant.
Running out of fuel is not a recommended experience. More fuel also means more weight, and in general many backpackers are trying to lighten packs in whatever way they can.
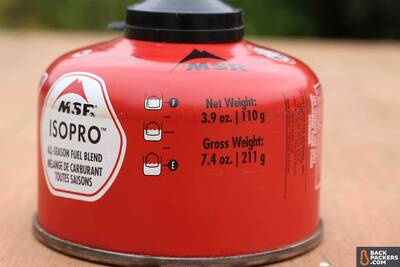
MSR isobutane canisters have small diagrams to measure how full your can is. If it sinks, it’s full. If it floats, it’s empty. This is not the most accurate, but a good ballpark. You can also compare the gross weight against current weight, subtract the 3.3 ounces of material weight, and end up with how many ounces of fuel you have.
There are a number of factors that go into stove and fuel efficiency. First, know that there’s no “perfect” solution. Stove and fuel efficiency have too many variables to nail it down. You have to consider altitude, temperature, wind, the stove type and specific model, the fuel type, and the meal you’re trying to cook (water or real food), to name a few.
We’ll break down aspects that affect efficiency below.
Stove Output: What Are BTUs?
The main consideration in efficiency, burn time, and stove power is the BTU, or British Thermal Unit. The British Thermal Unit “is a traditional unit of heat…defined as the amount of heat required to raise the temperature of one pound of water by one degree Fahrenheit.”
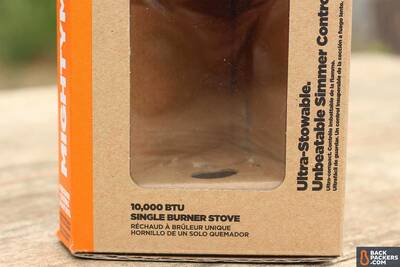
BTU listing on a new small canister stove.
You’ll find a BTU output listed on most stoves in the U.S. and can use this as a rule of thumb for how powerful they are going to be. (You may also see “W”, or Watt hours, another unit of power and heat. We’ll stick to BTUs as they are more common.)
To be clear, stove power, whether it’s BTUs or Watts, should really be written with a “per hour” demarcation, just like your car has Miles Per Hour. But most consumers don’t assign a real value to the BTU number, so it gets left out of marketing materials.
Generally speaking, the higher the BTU/hr the more powerful the stove is capable of. More power means faster boiling times and greater consumption of fuel.
Except, not always. The design of the stove has a lot to do with how that BTU power is channeled, so some stoves with a high BTU but poor design boil less quickly than those with a lower BTU and excellent design.
This is mostly determined through trial and error across the backpacking world. One aspect of our stove Picks is that they boil water effectively, no matter their BTU number. Backpacking stoves can range from 3,000 BTU to 12,000 BTU. Those with higher numbers will use more fuel more quickly, and (very generally) are more powerful.
Boil Time
The second aspect of efficiency is boil time. This is the most noticeable one for users, and what will matter for every single meal.
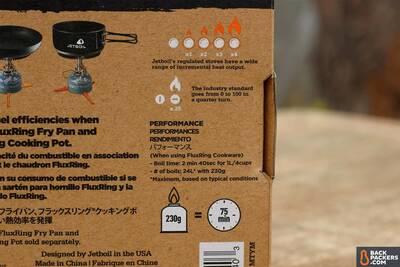
The box of any stove has a lot of information, one of which is the boil time. For the Jetboil Mighty Mo the boil time is 2 minutes 40 seconds for one liter in ideal conditions. That’s really good.
Many stoves list a boil time on the box. These are general ranges, but we’ve found them to be fairly accurate, as long as you’re not in extreme cold, above 10,000 feet, or in severe wind. Generally, boiling times fall in the 3-5 minute range per liter of water.
Canister stoves are considered the quickest boilers, as long as they are not inundated with wind. This includes small canister, integrated canister, and remote canister stoves, with integrated being the fastest (most of the time).
Liquid fuel stoves are the next fastest. These boil times change depending on the brand and model. When you count the time it takes to prime and light the stoves, it’s a longer process that can sometimes take 5-10 minutes.
Alcohol, wood-burning, and solid fuel stoves are the slowest. Often these times are twice as slow as canister or liquid fuel because there’s no real way to increase (or decrease) the heat.
Pots Matter for Boil Time
Beyond the design of the stove, the biggest factor in boil time is the pot.
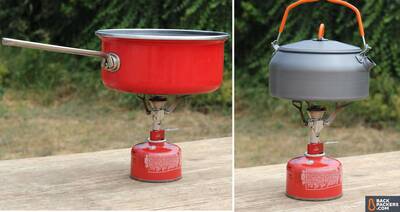
On the left you see a normal kitchen cooking pot on a small canister stove. That could tip easily. On the right is a backpacking kettle, which fits much better on the stove’s arms. Make sure your pots fit comfortably on your stove.
Integrated canister stoves achieve lightning quick boil times because their pots are engineered to work with that specific stove. However, most pots with a wide base will actually boil water faster if the stove has a wide flame than a tall, narrow pot. Integrated canister stoves utilize the heat exchanger ring and a more narrow, powerful flame to make the quick boil times of their narrower pots.
This is a constant balancing act, as you need to make sure your pot is stable, the flame is able to hit the full base, and the pot isn’t so full that it makes it slower.
Mixing and matching get get the right pot for the right stove is necessary! In general, if you have a small stove look at using a smaller pot. The bigger stoves with higher BTU, wider burners, and more stable bases can cook food and boil water in bigger pots.
Wind resistance
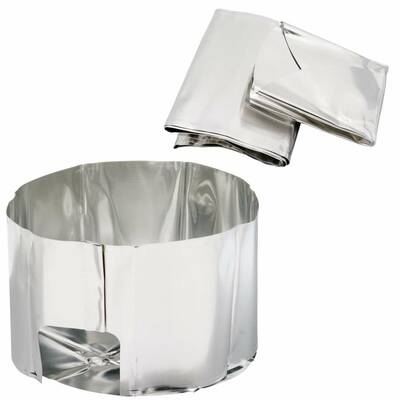
Most windscreens use a thin tinfoil-like material with a hole cut out for the fuel line.
Wind resistance has been mentioned numerous times in this Outdoor Guide because it’s the quickest killer of fire. If your stove is not protected on a windy night the flame will go out — it’s as simple as that.
This can be annoying on a canister stove, as you’ll have to relight and then protect. On a liquid fuel stove you’ll be worse off, as you have to prime and re-light the stove, which is more of a process.
Always carry a windscreen on you. You can use tinfoil, specially made screens, or an included windscreen (if your stove came with it) to block the wind. Doing so will greatly increase your flame’s strength, your boil time, and your fuel efficiency.
Small Canister Stoves and Wind Screens
The small canister stove is arguably the “best” type of stove for most backpackers. But it has a major flaw in wind resistance. These stoves sit on top of the fuel canister, which means you can’t use a windscreen around them, or you’ll overheat the canister and make it blow up (literally).
Small canister stove designs often have wind-proofing built into them, such as a three-sided burner that automatically relights if one side goes out. Others have aerodynamic designs or special wind deflectors.
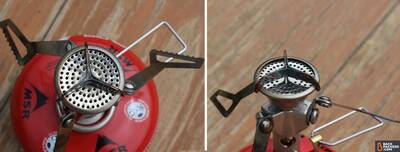
Each small canister stove deals with wind in their own way. The MSR PocketRocket 2 is split into three sections on the burner, which helps to keep wind from blowing out the entire head. The burner is also recessed under a small lip, which acts as a windscreen.
While all of these fixes help, know that small canister stoves may not work great in high winds.
Backpacking Stove Features
A stove without features is pretty boring! We’ve covered a number of features indirectly above, but it’s time to get into more of the specific functions of stoves and how they will help you cook the meal of your backcountry dreams.
Simmering
Simmering is, perhaps, the most sought after aspect of a stove for those who want to do more than boil water. If scalding H2O is your endgame, then don’t worry about getting a stove that simmers. If you want to cook meals — real meals — like Mac-n-Cheese, pasta, tacos, steaks or even pizza, you’re going to need a stove that simmers.
Simmering is generally done by twisting the valve on a stove down to the lowest setting without shutting it off (this implies your stove has a valve). The flame reduces to a minimum, and you leave your meal to stew in a soft heat.
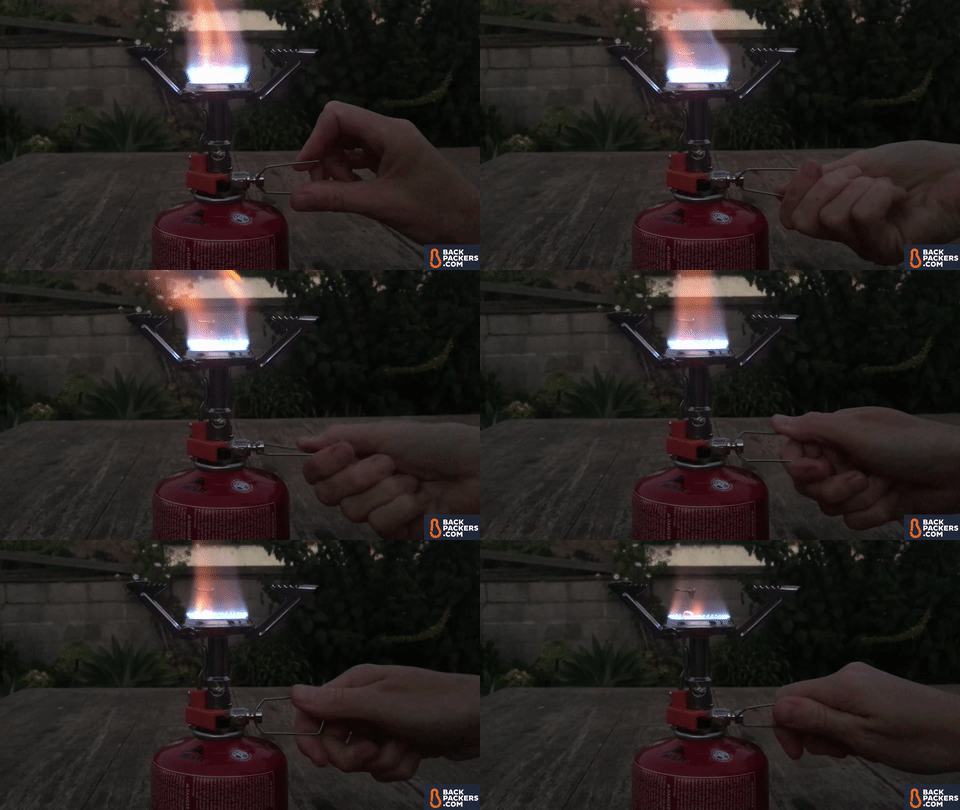
The Jetboil Mighty Mo has great simmer control. This starts near full blast, then decreases to a simmer.
Everyone has slightly different ideas of what a “good” simmer is, but the most obvious case is with onions. When you put onions and a bit of oil in your pot or pan, can they get glassy and clear, or do they turn brown due to high heat? If your onions are clear (and delicious smelling), you’ve got a simmer-er.
Stove Types That Simmer Well:
- Small Canister Stoves (not all models, but many do)
- Remote Canister Stoves (perhaps the best simmerers)
- Some Liquid Fuel Stoves (really depends on the model)
Stove Types That Don’t Simmer Well:
- Integrated Canister Stove (They really don’t simmer)
- Some Liquid Fuel Stoves (older models, like the Whisperlite, aren’t great for simmering)
- Any wood, alcohol, or solid fuel stove (these flames are just one height, so you can’t adjust down to a simmer)
Weight
We’ve touched on stove weight, but it’s time to go full bore. Backpackers are weight conscious people. The industry has trended toward lighter (and smaller) gear in recent years, and stoves are no different.
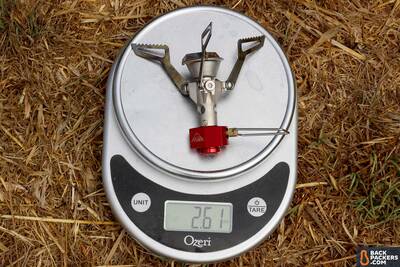
The MSR PocketRocket 2 is a whopping 2.61 ounces. That’s lighter than most headlamps!
Here are stove types broken down by general weight range:
- Small Canister Stoves: Between 2-8 ounces. Add an ounce or so for a carrying case, usually included. No other parts, and doesn’t include a pot, pan, or mug.
- Integrated Canister Stoves: 14-18 ounces. Includes the stove, heat exchanger rings, an included pot/mug, sometimes a stabilizer, and sometimes a cozy for holding the pot/mug.
- Remote Canister Stove: 6-8 ounces. These stoves are larger than small canister stoves, have wider bases, and include a fuel hose. They sometimes come with a carrying case, too, which adds an ounce or so.
- Liquid Fuel Stove: 10-18 ounces. These stoves come with a lot of parts, including the stove, fuel hose, wind screen, heat conductor, and repair kit. This weight doesn’t include the fuel bottle, which typically weighs another 2-5 ounces depending on size.
- Alcohol Stove: 1-2 ounces. These weigh almost nothing. The weight of a can of cat food, or even lighter if you go with a fancy titanium model. Often there are no other moving parts.
- Wood Burning Stove: There are many kinds of wood burning stoves. Some ultralight models weigh 2 ounces, while some fancy models weigh about two pounds. It depends if you’re trying to charge electronics with them (we’re looking at you, BioLite), or burn wood as simply as possible.
- Solid Fuel Stoves: 1-3 ounces. Typically those who want to use solid fuel also want as light a stove as possible. You can have a heavier stove, but most of the time they’re in this range and have no other moving parts.
Select your stove based on weight, if nothing else. You’ll want a stove that fits with your setup and can cook for the number of people and type of meals you’re accustomed to.
Packed Size and Nesting
While weight is one concern, packed size is another. Many backpackers want a stove that can fold up like origami to fit in tiny corners of their packs, or to nest easily in their pots or mugs.
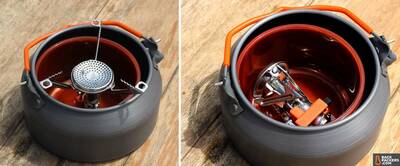
A stove that can collapse and nest in your pot and/or bowl setup is recommended. If your pot is big, you can get a big stove.
You’ll see stoves getting smaller and more foldable every year to appease the masses. Here are the stove types by how well they pack down, and if they nest easily:
- Small Canister Stoves: Very small pack size. They fold into themselves and take up as little room as possible. Built to nest easily in a small pot or mug.
- Integrated Canister Stoves: Larger pack size than small canister stoves, but still relatively small. Because they are built to work with a full system, these stoves always nest perfectly.
- Remote Canister Stove: The largest canister stoves. They still pack small, and often fold into themselves, but not nearly as small as the others. Due to the fuel line they will be harder to nest in pots.
- Liquid Fuel Stove: Very large and don’t pack down easily. They have so many parts that you usually need a separate carrying case just to hold everything. Don’t nest easily, unless you have huge pots.
- Alcohol Stove: Tiny and just one or two pieces. Can typically nest or fit anywhere.
- Wood Burning Stove: Depends on the stove. The expensive ones (BioLite) are large and don’t nest easily. The small ones typically break down flat and can slide anywhere in your pack.
- Solid Fuel Stoves: Similar to wood burning stoves, except almost always small.
Piezo Ignition — What Is It, and Do I Need It?
The best way to impress new backpackers is to have and use a stove with Piezo ignition. With a single click you magically light your stove — one press and BAM, fire. It’s fancy and fun, but what is Piezo ignition?
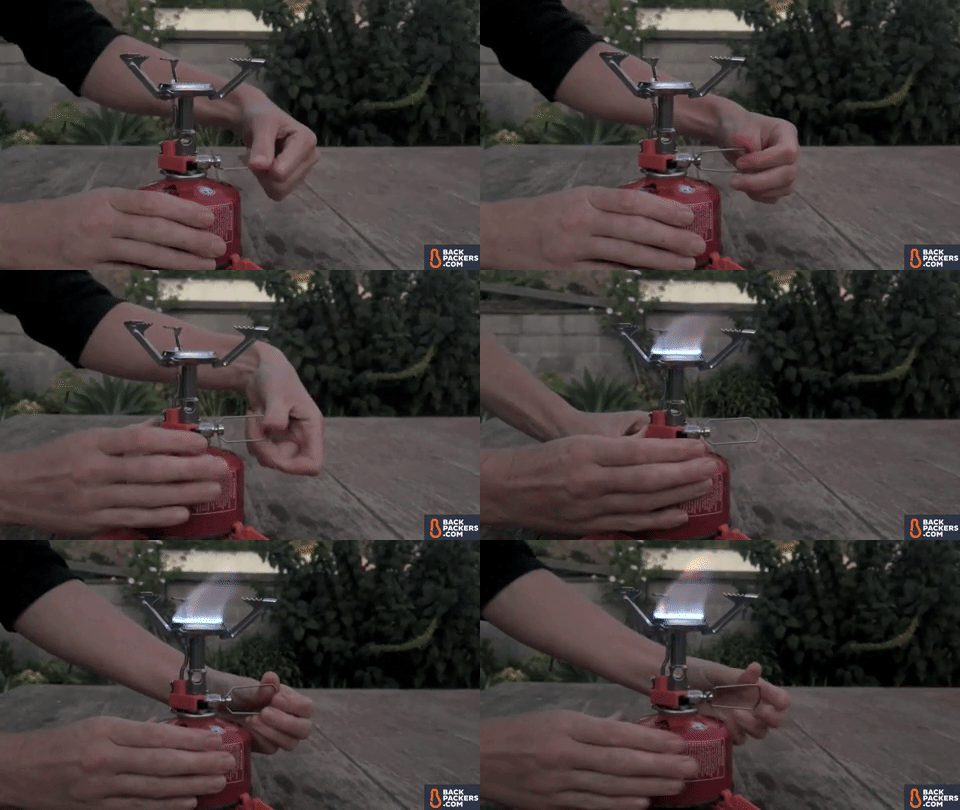
The small button pressed in this clip is Piezo ignition. Open the valve, click the button, and you’re ready to cook.
We’ll quote a reputable source here, as nobody on the team is a scientist:
“Piezo ignition uses the principle of piezoelectricity…the electric charge that accumulates in some materials in response to high pressure. It consists of a small, spring-loaded hammer which, when a button is pressed, hits a crystal of PZT or quartz crystal. Quartz is piezoelectric, which means that it creates a voltage when deformed. This sudden forceful deformation produces a high voltage and subsequent electrical discharge, which ignites the gas.”
So when you open the valve on a stove and click the auto-magic button, you’re hitting a piece of quartz crystal to create an electrical discharge. Fancy, right?
The Issues with Piezo Ignition
Some people love the simplicity of Piezo stoves. You don’t have to rummage around for a lighter or match, and the stove is even more of a self-contained unit. However, Piezo ignition has a few downfalls:
- Cold and Altitude: Piezo ignition works great at low elevation in the summer. But the second you try to ignite a stove in freezing conditions above 10,000 feet, you may not see the flame you’re looking for. This is a known issue and many backpackers use a backup fire starter (matches or lighter) to thwart the issue.
- They break over time: This is highly dependent on the manufacturer, and even on the individual stove, but Piezo buttons can fail over time. It’s a moving part that relies on a small hammer to hit a crystal, and small parts tend to fail after a certain number of uses. Once your stove has a defunct Piezo ignition, there’s not much you can do. The stove still works, but you have to light it like normal.
- Added weight: It’s not a huge weight addition (about 14 grams on small stoves), but hardcore gram counters will notice.
- Added Cost: You’ll often see a stove that is offered in “manual” and “auto” versions. The manual you have to light the old fashioned way, the auto with a Piezo. Typically manufacturers tack an additional $10 onto the auto stove.
If you like the convenience of a Piezo ignition stove, get one. They are certainly easy to use when they work!
Pressure Regulator
You’ll notice a handful of backpacking stoves say they have a built-in pressure regulator. This helps to keep the flame, fuel consumption, and general use in tip top shape in the cold.
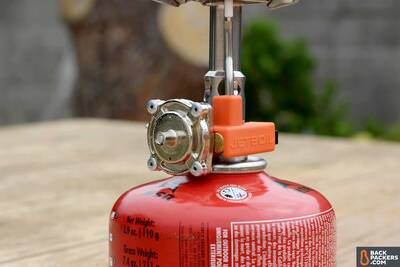
The circular shape on the Jetboil Mighty Mo is the pressure regulator.
There has been some dispute over just how much it helps stoves, and it’s something that’s hard to measure due to changing conditions. Overall we think a stove with a pressure regulator is a good thing — it won’t hamper the use of your stove at all. However, we don’t recommend specifically looking for a pressure regulated stove, unless you do mostly high alpine exploration.
Stove Stabilizers
The last feature worth mentioning for backpacking stoves is the stabilizer. Some stoves come with a stabilizer, but many have a specifically engineered stabilizer that’s sold separately.
These are most common in small canister stoves or integrated canister stoves, which are known to be wobbly. They usually come in a three-pronged base that attaches to the bottom of the canister, helping to create a more stable base.
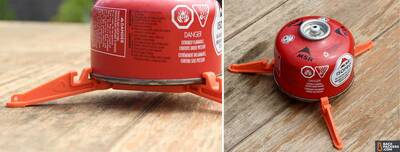
If you’re clumsy or have a particularly tall and unwieldy pot situation, by all means get a stabilizer. Spilled food is a camp foul and a no-no when it comes to Leave No Trace, so you’re better off having a very stable stove.
That said, if you’re careful you can get by without a stabilizer.
How to Light a Stove
You may have a fancy stove, fuel, and all the accoutrements to cook the tastiest meal in the West, but if you don’t have a way to light the stove you’ll be out of luck.
We recommend carrying two methods of fire on any backpacking trip. Seriously.
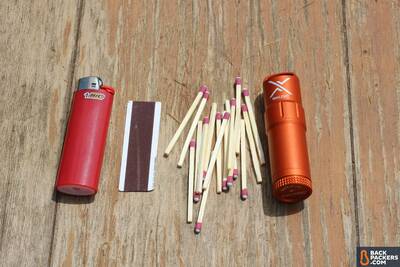
Bic, Matches, or a waterproof Zippo-style lighter (the TitanLight from Exotac) are all excellent ways to light a stove.
The most common fire starters are:
- Matches: Tried and true, matches are cheap, readily available, and essentially universal. Most backpackers carry matches in a old pill bottle to keep them away from water, and bust them out if all else fails.
- Lighter: Bic, Zippo — you name it — a lighter is the most common method of lighting a stove (or fire) in the backcountry. Just make sure your lighter has plenty of fuel before you head out.
- Flint Striker: A more rustic and badass method of fire/stove starting, a flint striker brings you closer to the wilderness. These are usually used to start camp fires, but can be used for a stove in a pinch.
- Piezo: Discussed above, the Piezo is some people’s first line of stove-starting. You’ll want to carry another method in case of failure.
You’ll want to turn the valve on your stove (or set up the wood/solid fuel), and light whatever it is you’re using. Put the fire to gas or kindling, and you’re all set.
Choosing the the Best Backpacking Stove for You
After all is said and done, what is the best backpacking stove for you? Most outdoor folk have two or three stoves, which allows them to take the right one for a specific adventure.
If you’re starting out, a small canister stove is probably your best bet. They won’t break the bank, they work, and they’re easy as pie.
Good luck, and happy cooking!
Affiliate Policy: We support the hours that go into our guides and reviews through affiliate commissions on purchases made through links in this article. Please help support us to create content like this!
Great article. Much rings a bell. After riding the length of South America with an old MSR pocket rocket, I can attest to the ease of ignition/ fast boil and lack of cleaning required compared with others I met with fuel stoves. I also found this little gem to work well for months at altitudes over 4,000m in Bolivia and Peru. This surprised me a lot. The boil times were a little slower but not terrible. This little gem of a stove has finally failed on me after more than 10 years of ownership and a solid 9 months as my only cooking source. As you noted, once broken it’s gone.. seems replacement is the only option. anyway nice useful read. Cheers
Thanks for reading and commenting Georgie! What stove do you think you’ll replace it with? The new MSR PocketRocket 2 is awesome.
Thanks for touching on a simple but important factor – the size of the fire ring vs pot. Reading reviews it seems a lot of users miss that a large pot on a small fire ring will likely create a hot spot and burn the center – and the smaller containers on a large camp stove style single burner simply hang out in the wind – ie warming a can of soup on a Coleman single burner.
That single burner went right back into the car camping tote after the last experience – it will work but a solo eater with back issues, weight is still a problem packing a “heavy” stove with 16 oz green container etc. Ultralite is now a mandate, not a choice.
So, pot size vs burner ring size, match them, then be careful as material and thickness are the next issue. Stainless absorbs a lot of BTU’s while heating – which does spread it out in the container base and hopefully reduces hot spotting. Thin walls don’t help, and Al/Ti aren’t helping either with their fast heat transfer – compared to say, cast iron.
It’s all a balancing act to get the most heat transfer with the least burning of food – which is where a solo stove isn’t optimal with prepared dishes. IE that can of soup. While many on the trail prefer freeze dried etc the cost of those meals is more justified by the long trail ahead, where someone out for a day of much more limited mobility can suffer the short haul weight for the pleasure of ‘normal’ lunch. We all approach our compromises differently.
Having gotten this far I find most of my choices are currently with gear no longer offered, or shortly to disappear. The Ozark Trail 4 pc stove with propane converter is current (early 2023) the Stanley Adventure 2 cup has disappeared from Wally’s, the UCO utensil set, too. It’s a better long spoon than the GSI which for some reason has started chipping off the silicone after less than half a dozen meals. Point is the Stanley pot and Ozark stove appear more compatible as the base to fire ring size seems to be cooperative.
Boil water, add freeze dried coffee and creamer, voila, cheapuccino in the bush. Beats an MRE heater and a small 4 oz canister gets a lunch or three done.