
Sleeping pads are the one item that should be on every backpacker’s pack list, but often isn’t. Even if you do have one, in your mind it’s probably less important than the backpack, tent, and sleeping bag. Yes, those are essential items for any overnight in the wild, but we’d argue the sleeping pad is just as important today.
Why? To put it succinctly: comfort and warmth. Sleeping pads have never been as comfortable, warm, and light as they are today. Camping with one completely changes the nature of sleep in the backcountry.
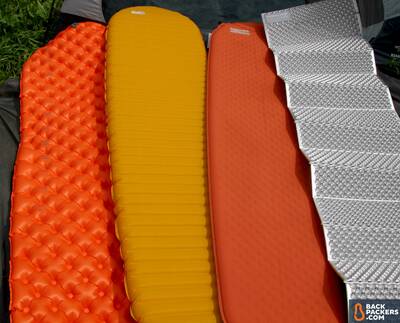
A small smattering of sleeping pads for camping and backpacking. Air pads, self-insulating pads, and closed-cell foam pads.
Below you’ll find a comprehensive guide to sleeping pads. We cover the difference between backpacking sleeping pads and car camping sleeping pads, the basic types of sleeping pads, how to optimize comfort and warmth for your trip, and get into all the nitty gritty terms that can be so confusing.
You can read the whole guide top to bottom (recommended, we build on points throughout), or click to individual sections with the Table of Contents. Get comfy.
- History
- Types of Sleeping Pads
- Insulation and R Value
- Comfort, Warmth, Weight, and Size
- Features
- Care and Maintenance
- Backpacker Types
History of Sleeping Pads
Unlike some of our other outdoor gear guides, the history of sleeping pads doesn’t have a storied past. There is no culminating moment when the first “pad” was created. OG backpackers like John Muir (yeah, those two things were just combined) didn’t use a pad — they either slept on the most comfortable ground around or cut down tree limbs to help boost them off the ground. (This method still works, but there are so many backpackers today that our forests can’t handle it.)

John Muir didn’t use sleeping pads. And he’d probably scoff at us for getting so particular. Image courtesy KQED, All Rights Reserved.
After this came the use of thin mats, usually made of compressed foam. These worked to increase comfort in a small way and helped to insulate backpackers so they could sleep in colder climates.
The major innovation in sleeping pads was engineered by Cascade Designs. It was called the Therm-a-Rest, and was the first pad to use air as a means of inflation and insulation. Does the name sound familiar? Cascade Designs is now the parent company of Therm-a-Rest, one of the most popular sleeping pad manufacturers in the U.S.
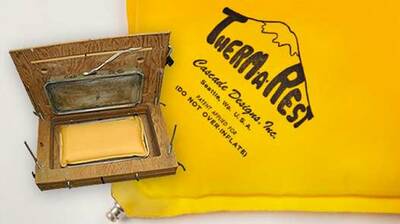
The first Therm-a-Rest. Image courtesy Cascade Designs, All Rights Reserved.
Cascade Designs held a patent for that initial innovation. They dominated the market until that patent expired, and now it seems like every gear manufacturer under the sun has a sleeping pad of their own. We’ll get into the types of sleeping pads below.
Types of Sleeping Pads: Camping Sleeping Pads vs. Backpacking Sleeping Pads
The brief history above actually outlines the three types of sleeping pads. When choosing a sleeping pad, make sure to know which kind of “technology” it uses. (That’s in quotes because, as of yet, there is no computer tech in sleeping pads.) Technically all the types of sleeping pads work as camping sleeping pads or backpacking sleeping pads. Each has their merits, so some are better than others for camping or backpacking.
Keep in mind the purpose of a sleeping pad: to provide comfort and insulation during sleep, allowing you good rest and a lack of frostbitten limbs.
The three types of sleeping pads are closed-cell foam pads, self-inflating pads, and air pads.
Closed-Cell Foam Pads
If there’s a true original sleeping pad, it’s the closed-cell foam mat. It’s a mat of compressed foam that’s typically under an inch thick. It doesn’t pack down small, but it remains light and cheap. There are small pockets of air in the cells of the foam, giving these pads insulative properties that help to keep you warm at night. Not very warm, but better than sticks on the ground.
You can buy nice closed-cell foam pads from well known brands like Therm-a-Rest for $45, or you can go to WalMart and pick up a blue “camp mat” that will run you about $8, give or take. These are typically backpacking sleeping pads, though some car campers on a serious budget turn it into a car camping pad.
There are obviously merits and pitfalls to closed-cell foam pads, which we’ll break down below.

The classic egg crate design of the Therm-a-Rest Z Lite Sol is a staple closed-cell foam sleeping pad for many backpackers.
Closed-Cell Foam Pad Pros
Cheap. The reality is that closed-cell foam pads are way cheaper than everything else. Even the nicer models, which hover in the $45 range, are much less money than self-inflating pads or air pads. Most backpackers or campers have used a closed-cell foam pad before — it was probably their first pad! They’re actually so cheap that it’s smart to have one lying around, just in case.
Durable. There’s no air, so there’s nothing to pop. You can certainly destroy a closed-cell foam pad, but you’ll have to saw it in half. These things can survive animals, rough ground, and manhandling.
Lightweight. Air pads have surpassed closed-cell foam as the lightest pad around, but closed cell still gives them a run for their money. Depending on the length and thickness, a closed cell pad will be under one pound. You can cut it to length too, something gram counters are known to do.
Use it around camp. You can use a foam pad around camp with ease. Again, you don’t have to worry about it popping. You also don’t have to “blow it up” or fiddle with it at all. It’s probably on the outside of your pack anyway, so if you want a foam seat just unfold it.
Additive insulation. Some people like to take a closed-cell foam pad in addition to a more comfortable pad in cold conditions. The closed-cell foam pad can protect the other pad and increases the amount of insulation, making you much warmer.
Closed-Cell Foam Pad Cons
Not comfortable. Everything you gain above, you lose in heaps of comfort. The truth is that these pads are not comfortable to sleep on. There’s a reason sleeping pads needed continual innovation. Many backpackers and campers have taken the time and money to upgrade beyond a closed-cell foam pad precisely because they make for a terrible night’s sleep. If you’re a back sleeper who can crash on your buddy’s hardwood floor no problem, this is the pad for you. Otherwise, be prepared for a sore back and body.
Bulky. Most air and self-inflating pads today roll up into small-ish packages. Even if they aren’t minuscule, they end up more like a sleeping bag and less like a long rectangle, which is how closed-cell foam pads always are. And, despite their durability, they really shouldn’t be crammed into a backpack. You’ll see closed-cell foam pads on the outside of most packs because of their bulkiness.
Self-Inflating Pads
When it comes to recognizable sleeping pads, self-inflating pads are probably the most popular and widely used today (though air pads are hot on their heels). The self-inflating pad is what Therm-a-Rest invented and patented in 1972, and it has forever changed how backpackers and campers sleep.
It uses a combination of air and open cell foam to create a comfy, stable surface on which you can sleep. Opening the valve of these pads allows air to enter in an automatic and vacuum-like process, which the open cell foam creates. The air rushes in to fill the spaces in the foam, inflates the pad most of the way, and saves the backpacker or camper time.
Self-inflating pads are used as both camping sleeping pads and backpacking sleeping pads, but car camping is the best application, because foam tends to be heavy.
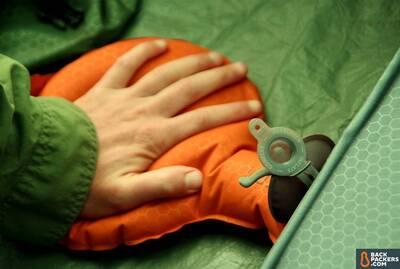
This is sped up quite a bit, but shows you how a self-inflating pad goes from completely rolled to almost fully inflated.
Despite their name, self-inflating pads do not inflate all the way by themselves! They never have, and they never will.
These pads do require a few breaths after their self-inflating process (up to about 10, depending), so keep that in mind if you want a good night’s sleep.
Below we’ll parse the pros and cons of self-inflating sleeping pads.
Self-Inflating Pad Pros
A good middle ground. Self-inflating pads sit squarely in middle of closed-cell foam pads and air pads. They are comfortable, pack well, inflate quickly, are durable, and don’t have to cost very much. Most backpackers own one or have used one at some point. This makes them versatile car camping sleeping pads and backpacking sleeping pads.
Wide range of products. There are cheap self-inflating pads that are thin, only moderately comfortable, light, and pack easily. Then there are deluxe self-inflating pads for car camping, which are huge, heavy, and almost as comfortable as your bed at home. The technology allows them to hit many market points, so consumers can find a pad they love.
Comfort. The self-inflating pad’s main claim to fame is just how comfortable it is. When compared to closed-cell foam pads it’s undeniable — they are lightyears ahead. When compared to air pads, it depends on the model. However, overall, self-inflating pads create a more stable surface to sleep on. They also let you sleep on foam, which is more like a mattress. Air pads are just air.
Durable. Typically self-inflating pads are durable, as manufacturers use heavy-duty fabrics less likely to puncture on the exterior. When stored and cared for properly, self-inflating pads can also last an extremely long time.
Insulated. Due to the durable fabric and foam, self-inflating sleeping pads have more insulation than air pads and closed-cell foam pads. You can get an air pad with more insulation, but you’re going to pay for it. Self-inflating pads strike a good balance of insulation, so that most backpackers and campers will be happy with the warmth they provide.

A classic self-inflating sleeping pad.
Self-Inflating Pad Cons
Heavy. The main issue with self-inflating pads is their weight. Yes, there are many lightweight options today, but ounce for ounce they are heavier than air pads or closed-cell foam pads. This is because of the durable fabric and foam — these materials add up.
Can be bulky. Not all self-inflating pads are bulky, but when compared to air pads they definitely are. If you get a cheaper self-inflating pad it will probably roll up without folding, which means it’s hard to stuff in a backpack. This is no problem for car campers, but backpackers may take issue.

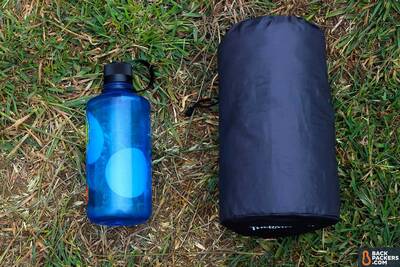
This is our attempt to roll this backpacking-specific pad as tightly as possible. Someone less particular will probably end up with a bigger rolled pad, and it’s much bigger than a standard Nalgene.
Takes time to pack up. This is a nitpick, but rolling up a self-inflating sleeping pad (especially a large car camping one) takes some skill and time. You have to expertly get all the air out of the pad, usually through one little valve. This requires pressing on it, rolling it with patience, and being diligent. Most of the time you’ll see self-inflating pads out of their storage sacks because people don’t take the time to stuff them back in, which increases risk of damage.
Air Pads
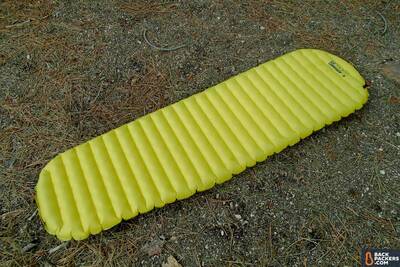
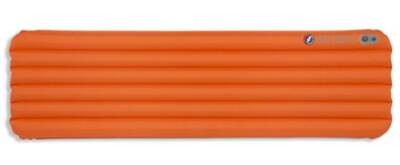
Air pads are the most recent kind of pads to hit the market. They have no foam in them, and rely upon air alone for full inflation. They are a favorite among Wilderness Backpackers and Ultralight Backpackers due to their size and weight, and are therefore best as backpacking sleeping pads.
Air pads have changed significantly in the last five years. They now match the comfort of most self-inflating pads, and exceed them in some cases. You can get a thicker air pad for the same (or less) weight when you’re using air to inflate, so these options are excellent for side and stomach sleepers. That said, they are also usually more expensive than the other kinds of pads.
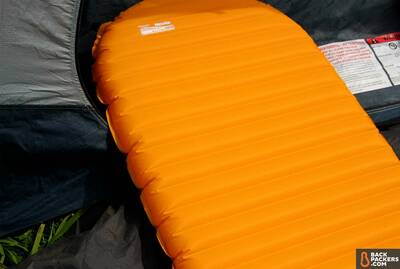
The Therm-a-Rest NeoAir XLite is the standard backpacking air pad on the market.
Here’s a pro/con list of air pads.
Air Pad Pros
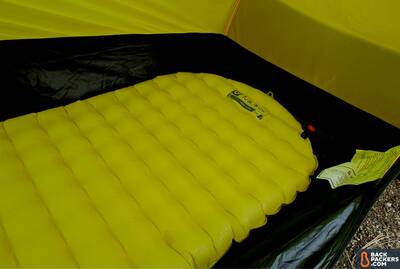
Lightweight. Air doesn’t weigh anything, especially when it’s not even in the pad until you want it to be. The main benefit of an air pad is that its thickness doesn’t depend on foam, and foam is heavy. The nicer pads are decidedly ultralight, hovering around the 12-15 oz. mark. For the level of comfort they provide, this is crazy lightweight.
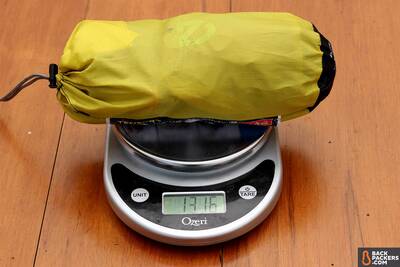
The Nemo Tensor 20R Mummy pad weighing in. Ultralight, as they say.
Comfortable. Air pads these days are surprisingly comfortable. You can get thicker pads that are still lightweight and packable, which usually increases insulation and overall comfort. This depends a lot on the baffle and design of the pad. If it’s done well, you can sleep on three inches of luxury air. Many backpackers are finding air pads to be the most comfortable night’s sleep they’ve ever had.
Compressible and packable. Also due to the lack of foam, air pads compress down to tiny packages. You’ll see this with high-end air pads, which often come out smaller than your 32 ounce Nalgene bottle. This also usually makes packing a lot easier, because there’s just the outer material to roll up, rather than foam that you have to fully deflate.
Air Pad Cons
Fragile. Durability is all relative, but when compared to self-inflating pads and closed-cell pads, air pads are much more prone to tearing or ripping. This is due to their lightweight construction, where less ounces matter more than burly fabric. Air pads are best when treated with care, and can be repaired fairly easily in the field if you do get one scraped up. Keeping them away from sharp sticks, rocks, and dogs is the best way to avoid ripping an air pad.
Expensive. This is not true across the entire market, but generally speaking air pads are more expensive than other pads. Most high-end backpacking pads are air pads, and the technology put into them is just on another level. This is all in an effort to reduce weight and size, while increasing comfort.
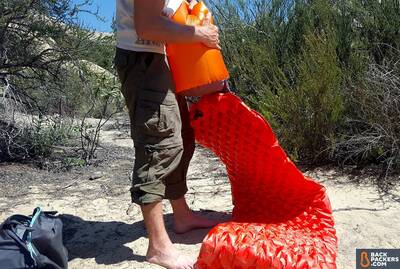
Takes a while to inflate. Air pads are inflated 100% by air, which typically means your breath. This can take up to three minutes, depending on models and size, but usually falls around 30-60 breaths for complete inflation. After a long hike you might not want to spend the time blowing up a pad, as it can make you dizzy. There are a variety of methods to help make this process quicker, and in the last year or two manufacturers have started making sure there’s an alternative to blowing up with your breath.
Air pads take a while to blow up by mouth. This is a two minute process condensed for your viewing pleasure.
Noisy. This is not true for all pads, but some very popular ones (we’re looking at you, Therm-a-Rest NeoAir XLite), are super noisy. This is due to an insulating, ultralight foil that’s put in the pads. Some people can’t stand noise when they’re rolling around, others don’t mind. Test one out to see if you can handle it.
Deflates a bit. Because air pads only air have in them, if temperatures fluctuate greatly in a night they can deflate a bit. This has to do with air pressure, temperature, and other scientific things that we’re not going to go into detail about. Just know that if you wake up and your pad is a bit deflated, it probably doesn’t have a hole. Make sure the mattress is firm before going to bed.
Bouncy. This has to do with how the air pad is built, but some are known to be bouncy. Think of a bounce house or pool toy — it’s just air inside there, and air covered in nylon or polyester can be bouncy. An air pad shouldn’t be bouncy when you lay on it, but some are. This means testing out air pads for your specific body is a good idea.
Sleeping Pad R Value, Insulation, and Warmth
When it comes to survival, the warmth provided by a sleeping pad is its most important function. Being cold is the worst, and if you’re unprepared it can be downright dangerous.
All types of sleeping pads provide some amount of warmth through insulation. This is often measured and advertised through sleeping pad R Value or a degree rating. Below we’ll break down the elements that make a sleeping pad an essential part of your warm sleeping system.
First, though, it’s important to note that sleeping pads are one part of your sleep system. A sleeping bag or backpacking quilt plays a huge part in keeping you warm, and your shelter also matters. You want the correct combination of all this gear for the environment you’ll be sleeping in.
How Do Sleeping Pads Keep You Warm?
There is a complex scientific answer to this question, but it’s not necessary to know as a typical backpacker or camper. In general, sleeping pads keep you warm by creating a layer between your back and the ground. The ground is cold, your back is warm. If lying directly on the ground, that coldness will seep into the warmth of your back and cool you down overall, even if you’re stuffed in a cozy sleeping bag.
The pad itself provides a small amount of warmth, but it’s really the air in the pad that does the most work. This is why air pads and self-inflating pads offer more warmth than closed-cell foam — they have more air in them.
This layer of air helps to maintain the temperature around your body, therefore keeping you warm.
That said, air certainly helps to insulate, but too much of it is a bad thing. If you sleep on a giant, more traditional air mattress (that blows up with a pump), you’ll notice it can get quite cold. There’s too much air in this case.
The main way to gauge all of this is through sleeping pad R Value.
What are Sleeping Pad R Values?
Sleeping pad R Values are the outdoor industry’s best attempt to standardize the warmth a sleeping pad provides. An R Value is technically the “measure of thermal resistance, or ability of heat to transfer from hot to cold, through materials.” As you might imagine, R Value is used to determine many other product’s insulative properties, like walls in homes.
For sleeping pads, R Values are not determined by a standardized, independent body (like EN testing for sleeping bags). Therefore, there is no “correct” R Value that can be assigned to any pad. Each manufacturer has their own testing method. Yet sleeping pads are given R Values by companies anyway, and for the most part they are accurate.
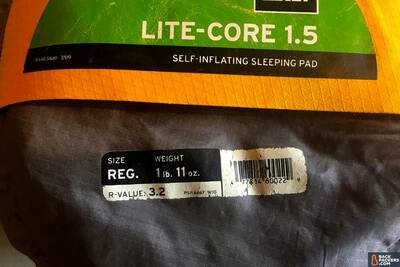
The R Value is sometimes printed right on the stuff sack for the pad, in this case a self-inflating pad that REI no longer makes.
For sleeping pad R Values, the numbers range from 1 to 10 — the higher the number the more warmth the pad provides, and the colder temperature you can expect to sleep comfortably in. There are also decimals used in these numbers, so an R Value of 3.3 is actually warmer than an R Value of 3.
While there is no specific temperature studied in relation to these R Values, the industry generally breaks down the numbers like this:
1-1.5 R Value: No real insulation properties. Best for warm summer nights. Can be dangerous if used on colder nights, as they will suck warmth out of you.
2-2.5 R Value: Very basic insulation. Provides a small amount of warmth, still best in warm temperatures, somewhere above 65 degrees. Often the R Value of closed-cell foam pads.
3-3.5 R Value: Solid insulation. Often enough warmth for three season backpacking and camping, with temperatures ranging between 35-60 degrees. (Though 35 degrees is quite cold, and cold sleepers will want a higher R Value.) Many air pads and self-inflating pads have an R Value around this number.
4-5 R-Value: Almost good enough for winter, but not quite. Pads with an R-Value of 4, or up to 5, are best for backpackers who run cold and want a three season pad.
5-10 R Value: Any pads that have an R Value of 5 or above will be warm enough for winter use. Obviously if you’re a very cold sleeper, go higher (if you can find it). And if you’re in sub-freezing conditions, consider getting the highest R Value available. Very few pads have R Values above 6, unless they’re heavy duty base camping sleeping pads.
Add R Values Together
One aspect of R Values that backpackers don’t often realize is you can add two pads together to increase overall insulation and warmth. This is typically done by taking an air pad and a closed-cell foam, stacking them, and combining both R Values.
If you’re trying to decide between a more heavily insulated pad (one with higher R Value) and a less insulated one, this can help make the decision. More insulation often means a heavier pad, but if you don’t need that insulation all the time, you can get the same warmth with two pads, and save weight on summer trips.
Insulated or Uninsulated Sleeping Pads
To confuse matters a little more, you’ll see sleeping pads sold in “insulated” and “uninsulated” versions. In general, these two pads will be exactly the same, but the insulated version has a higher R Value, and sometimes more durable fabric.
A classic example is the Therm-a-Rest NeoAir XLite and Therm-a-Rest NeoAir XTherm. The XLite is the “uninsulated” version, while the XTherm is the “insulated” one. However, both have decent R Values when you look at the specifications.
Always look at the R Value or temperature rating listed for an individual pad, and make the decision based on your most common weather scenarios. Just because a pad has a higher R Value doesn’t mean it’s better, and just because a pad is “uninsulated” doesn’t mean it has an R Value of 1.
Also, not all manufacturers print R Values on their pads. Some, like Nemo Equipment, use generic temperature brackets, like a pad that is good from 30-40 degrees Fahrenheit.

Nemo Equipment doesn’t use R Values. Instead, they list the minimum temperature their pads are rated to be comfortable in.
In the end you’ll want to rely on manufacturer reputation and reviews for the claimed warming properties of a sleeping pad, because there is no standardized testing.
Sleeping Pad Comfort
When it comes down to it, sleeping pad R Values are about survival. But, for the more casual user, sleeping pads mainly about comfort. If you aren’t worried about freezing to death, you’re just concerned you’ll have a bad night’s sleep in the wild.
Being warm is one factor of comfort. If you run cold, make sure to get a pad (and sleeping bag) that can handle the environment you’re in.
Beyond warmth lies the entire realm of comfort. Much like shopping for a mattress at home, finding your backcountry bed is a complex topic. There are a variety of factors to consider when picking a sleeping pad, which we’ll break down below.
Sleeping Pad Size and Shape
The most obvious aspect of comfort is the size and shape of a sleeping pad. Below we’ll list what the most common sizes, shapes, thicknesses, etc. are, and how you can tweak them to fit your body.
Know that most sleeping pads come in Regular and Large versions. Sometimes there’s an X-Large version, a Women’s version, or a Small version. Beyond this, individual pads may have other variations.
Sleeping Pad Length
The length of most sleeping pads is 72 inches, or six feet. If you are taller than that, or like extra leg room, look for a Large version. This typically pushes the length to 77 inches, or even 80 inches in a few cases.
Women’s specific pads tend to be 66 inches in length, which is quite short.
Finally, there are “Small” pads that are roughly 47 inches in length — these go down just past your butt. These aren’t as comfortable (obviously), but greatly reduce weight.
Sleeping Pad Width
Your standard, “Regular” pads are 20 inches wide. This is often enough space to sleep, but leaves no room on the sides. Your elbows and arms may fall over the side of the pad, and there won’t be much room for shifting around. That said, it’s what most people have.
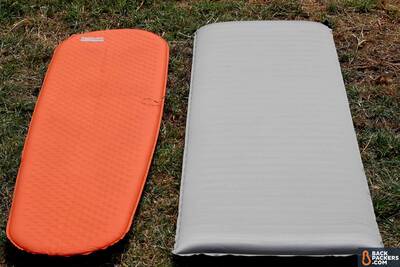
The Therm-a-Rest ProLite Plus pad on the left is 20 inches wide, which is standard for most backpacking pads. The REI Camp Bed 3.5 on the right is 25 inches wide. Deluxe.
Many pads come in a “Regular Wide” and “Large Wide”, which increases the width to 25 inches. For most people a 25-inch camping sleeping pad or backpacking sleeping pad is more than enough for a great night’s sleep. For pads that prioritize comfort over everything else (or are for very large people) the width goes up to 30 inches. These car camping sleeping pads tend to be luxurious and heavy.
Tapered Pads (Mummy, etc.)
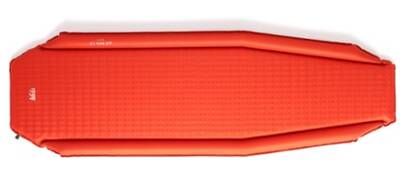
The above listed widths refer to the widest part of the sleeping pad. There are rectangular pads that don’t decrease in width, but many backpacking sleeping pads assume the “mummy” shape. There are many variations on this shape, but in general the width of the pad tapers from the hips down to the feet. This cuts overall weight, space, and conforms to the shape of many sleeping bags.
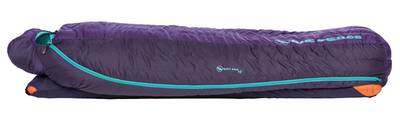
This is a classic mummy shape for backpacking sleeping pads. This one doesn’t taper quite as much as others.
Since each manufacturer is different, if you’re looking at a tapered pad you really should lay on one before you buy. No manufacturer does the taper quite the same — some pads end up feeling much wider, others much smaller. Getting one that suits you is best.
Couples Sleeping Pads
In a conversation about sleeping pad width, we have to mention couples sleeping pads. These have the same length as normal sleeping pads, but double the width. You’ll find couples pads with widths of 40 inches, 50 inches, and 52 inches in some cases.
These are great options for couples who know they’ll be sleeping together on nearly every outing, as it can reduce weight a little bit (compared with two separate pads), and greatly increase the comfort of sleeping next to someone.
That said, most backpackers don’t have a couple’s pad. The packed size is much bigger, and you’re not always sleeping next to another a person. Occasionally, like the Sleep Number commercials, you and your partner will want different material, size, or style of sleeping pad. We recommend each person pick out their own, unless you really know what you want.
Sleeping Pad Thickness
When it comes to comfort, thickness is one of the largest factors. Closed-cell foam mats are notoriously thin — about an inch thick (or less) — and the comfort speaks for itself. It’s a tiny step above lying on the ground. Self-inflating pads and air pads have a range of thicknesses, especially when looking at backpacking sleeping pads and car camping sleeping pads.
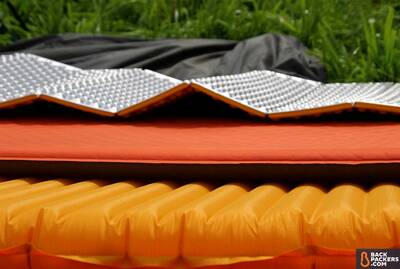
From the top down: closed-cell foam pad .75-inches thick, self-inflating pad 1.5-inches thick, air pad 2.5inches thick.
Backpacking Sleeping Pad Thickness
Sleeping pads for backpacking typically fall under one of the thicknesses below. Keep in mind the type of sleeping pad as well, because that will influence weight and comfort of sleep in relation to thickness.
- 1 inch or under: Most closed-cell foam mats are under an inch thick. They are just a step above sleeping on the ground, and not very comfortable.
- 1.5 inches: A common thickness for self-inflating backpacking pads, this was the standard for a long time (and still is in a lot of cases). This works if you like being close to the ground and stable. Not ideal for those who sleep on their sides. Hips can dig into the ground, which is uncomfortable and reduces overall warmth.
- 2.5 inches: The new standard for air pads and self-inflating pads. This thickness boosts you off the ground, allows lots of air for insulation, and isn’t so high that it’s bouncy. Many pads, especially air pads, fall into this category, and are quite comfortable.
- 3 inches: Pushing the envelope is the 3-inch pad. Achieved usually by air pads, three inches is the highest we recommend. If the pad is constructed well, it can be plush and comfortable. If not, it can be bouncy. Test the pad before buying.
Camping Sleeping Pad Thickness
Most car camping sleeping pads are self-inflating, and don’t care much about weight or packed size. Backpacking sleeping pads can (of course) be used for car camping, but for those who won’t ever have to hike with a pad on their back, these are a better option.
Car camping sleeping pads typically fall under one of the thicknesses below.
- 1.75-2 inches: Assuming you aren’t using a closed-cell foam mat for car camping (not recommended), 1.75 inches is the thinnest pad available. While not deluxe, these pads are often cheaper, still provide lift off the ground, and are very stable.
- 2.5-3.5 inches: This is typically the sweet spot for car camping sleeping pads. A 3-inch self-inflating pad will be high off the ground, very stable, and provide lots of insulation due to the foam. They don’t pack up well and weigh a ton, but you’re car camping.
- 4 inches and up: The most deluxe models of car camping sleeping pads are 4 inches or more. These typically have a full sidewall, like the Exped MegaMat line, and provide unrivaled comfort. They are very heavy, and very expensive.
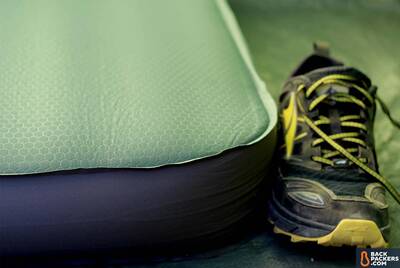
This shows the MegaMat 10 sleeping pad next to a trail runner, the Lone Peak 3.0. It’s a 4-inch thick camping sleeping pad with 3D walls. Pretty much a real bed, yet it’s a self-inflatable sleeping pad.
Sleeping Pad Packed Size and Weight
The above outlines the overall size of a sleeping pad when it’s unpacked and fully inflated. This matters most, as you’ll be sleeping on it in that state, but another important consideration is packed size. This relates to weight, as smaller packed size usually means less weight.
Backpackers and campers today have a wide gamut of sleeping pads to choose from. Some are obscenely heavy and bulky, others are lighter than a rain jacket and pack down smaller than a water bottle.
We’ll break down these sizes and weights by Backpacker Type below.
Sleeping Pad Packed Size and Weight for Ultralight Backpackers
In general, Ultralight Backpackers will want to stay under 16 ounces (1 pound) for a sleeping pad. Cheaper closed-cell foam pads fall in this weight class, as do many of the nicer air pads. You’ll be hard pressed to find a self-inflating pad under this weight, but air pads are the norm for Ultralight Backpackers.
The largest sleeping pad packed sizes are 20 x 5 x 5.5 inches, which is a closed-cell foam pad. This is sort of obscenely large, but very light. You strap this to the outside of your pack.
The more common packed size is an air pad in the realm of 9 x 4 inches, or less than a typical Nalgene water bottle. Air pads pack down easily, compress into cylinder shapes, and don’t take up much space any more.
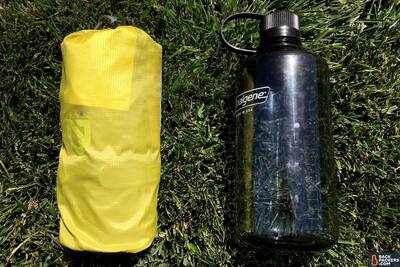
The Nalgene is the gold standard of size comparison. High end air pads are the same size, or smaller, than Nalgene bottles these days.
Sleeping Pad Packed Size and Weight for Wilderness Backpackers
Wilderness Backpackers might use the same pads as ultralight backpackers, but they aren’t going for the lightest and smallest thing on the market. Due to the sheer number of sleeping pads available, packed size and weight varies quite a bit.
A common weight for Wilderness Backpacker sleeping pads is 22-25 ounces. The weight varies greatly depending on the type of sleeping pad used, and what size the pad is, but you can expect anything from 16-28 ounces for a solid pad.
A more common size for these pads, which includes self-inflating pads, is 11 x 5 inches. This is a noticeable difference from the tiny air pads, but still fits in backpacks easily.
Not tiny, but not huge. Self-inflating pads can fit in a backpack fairly easily, but they just don’t compare to air pads when it comes to size.
Car Camping Sleeping Pad Packed Size and Weight
Backpackers are looking for something that can easily fit in a backpack. Car Campers are looking for something that can easily fit in a car. The size and weight jumps up significantly, especially for luxury models.
A common weight for car camping sleeping pads is anything between 3-5 pounds.Yes, pounds. These pads are often self-inflating pads with tons of foam, 25-inch widths, and a solid heaping of thickness. In a word: heavy.
Car camping sleeping pads don’t fold in half, so their packed size is almost always 25 or 30 inches wide. The depth of the packed size varies, but it’s often in the 6-inch range. This is a large, long shape that will take up room in your car, and give you plenty of cushion while you sleep.
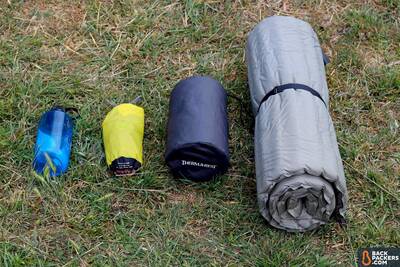
A good range of sizes. Nalgene on the left, then the Nemo Tensor 20R Mummy, then the Therm-a-Rest ProLite Plus, then the REI Camp Bed 3.5. The Camp Bed is the one specifically meant for car camping. You can probably tell why. Way bigger and heavier. Way more comfortable, too.
Sleeping Pad Baffle Construction
The last major element of a sleeping pad’s comfort is how the baffles are constructed. Sleeping pad baffles bear a resemblance to baffles used on down jackets and sleeping bags, and they also utilize the same general principles for heat retention.
There are five main types of baffle construction in sleeping pads:
1. Dimpled Flat Surface
This isn’t really a “baffle” pattern in the traditional sense. It refers to the construction of most self-inflating sleeping pads. The foam makes for a very even, level surface, and does the job of insulating without major baffle patterns.
There are often small dimples in these pads to help with slippage.
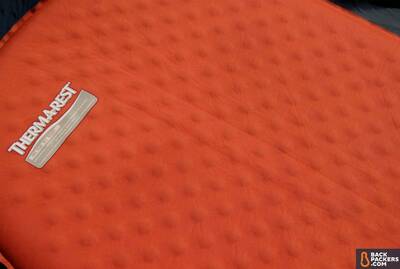
The Therm-a-Rest ProLite is a classic self-inflating pad. Low to the ground and stable, it doesn’t have a baffle pattern so much as small dimples.
Horizontal Baffles
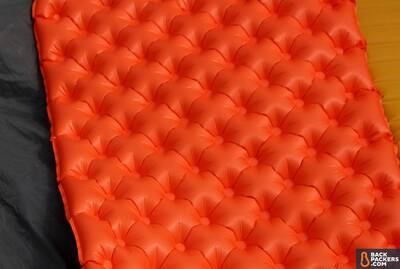
Horizontal baffles are the most common among air pads, and considered the most stable. They consist of many horizontal ridges, which distribute your weight evenly and keep your shoulders spread out when lying down.
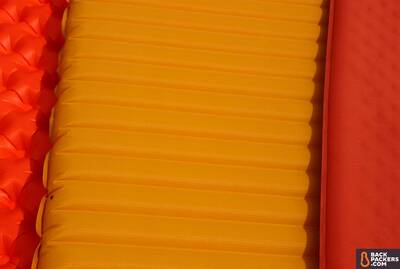
The center sleeping pad is an air pad that has deep horizontal baffles. The pads on either side do not.
Vertical Baffles
Vertical baffles are still common, but often suffer from the “taco” syndrome, where you feel like you’re being rolled into the center of the pad. Also, moving around in the night is typically less stable on a vertically baffled pad.
That said, if they are stable, they can be very comfortable and stay in line with your bag much better, keeping you from slipping.
Big Agnes has a number of pads, like the Insulated Air Core Sleeping Pad, with vertical baffles.
Quilted Baffles
Quilted baffled patterns are relatively new, and utilize both horizontal and vertical baffles to create small mattress-like pockets. This is supposed to make pads more stable, retain heat, and actually feel like a mattress.
So far the industry has been accepting of quilted baffle designs, and more products are getting them.
The Nemo Tensor sleeping pads have a quilted baffle surface. This is meant to improve stability and mimic your mattress at home.
Unique Baffles
We can’t list every individual baffle type here because many companies have tried unique options. Klymit is a big proponent of this — they create pads that have V-shaped baffles that contour to the body and pads that are missing entire sections (called Body Mapping).
Another company with unique pads is Sea to Summit. They use something like quilted baffles, but with more of a focus on a mattress feel.
Sea to Summit’s Air Sprung technology is unique among the sea of sleeping pads.
Sleeping pad baffle technology will continue to develop in pursuit of the holy grail: comfortable, warm, stable.
Sleeping Pad Rails
There’s one important element to sleeping pad construction not yet mentioned: rails.
Some sleeping pad manufacturers are acutely aware of sleepers falling off their pads in the middle of the night. To combat this they build extra puffy rails into the edges of their pads, which helps to cradle sleepers.
The REI Air Rail 1.5 sleeping pad has pronounced rails to keep sleepers from sliding off.
Done right this can create a truly comfortable sleep experience, especially for back sleepers. However, done wrong, it can lead to awkward sleep, weird inflation, and can be more of a gimmicky feature than necessary.
Putting in rails is a nice touch, but often implies the manufacturer hasn’t spent time making sure the pad will hold a sleeper completely flat on its own.
Sleeping Pad Features
With the construction of sleeping pads fully outlined above, it’s time to get into sleeping pad features. These include everything else a pad is made of, and will help you to fine tune the process of picking the right pad for you.
Sleeping Pad Valves
One of the largest considerations in picking a sleeping pad today is what type of valve you want. Valves are how you inflate and deflate a pad. Once upon a time every sleeping pad used the twist and pull valve — this is what Therm-a-Rest pioneered, and still uses (for the most part).
However, in recent years valves have been rethought. Here are the sleeping pad valves you can choose from today. Note that companies often use one type of valve across their pads, so if you have a valve preference it may mean you have a brand preference.
Twist and Pull Valves
Twist and pull valves are the classic way to inflate and deflate a sleeping pad. They are tiny black cylinders at the end of your mat. You push, twist, then pull to open the valve, affix your mouth to the top, and blow. Once the pad is inflated, you push and twist the valve back, locking it in place.
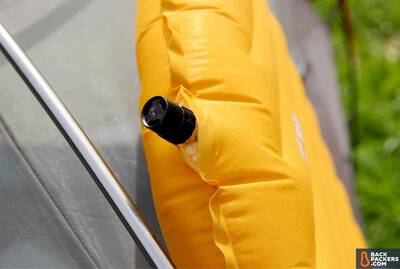
The twist and pull valve is used on most sleeping pads, especially pads pre-2000.
While these valves are very common, and generally work well, they have some issues.
First, you often have to keep your mouth affixed to the valve while you’re not blowing air, or air will leak out. They don’t have a way to block airflow when “open”. Nobody wants to suck on their sleeping pad valve for a solid minute. But you have to. (Note: This is only true for some twist and pull valves.)
Second, they are pokey. If placed poorly, you may feel the valve in the night, or worse, open it up accidentally. The fact that they stick out of the pad at an angle means they can get kicked, stepped on, or accidentally opened. None of this is good.
Third, they let air in and out slowly compared to other valves. It’s not a terrible flow rate, but could be better. Some sleeping pads for camping have multiple valves or oversized valves to help with this.
Flat Valves
The most promising valve now on the market, flat valves were created by Exped, and aim to fix all the problems with twist and pull valves. Like the name implies, they lay flat against the pad, meaning they don’t stick out, can be slept on, and (almost) never open by accident.
Flat valves also won’t release air when you’re not blowing into them. This allows you to take a breath away from the pad, talk with friends, and generally “rest” during a long blow up process.
Flat valves are typically constructed in three parts: the first layer, which closes the valve completely, the second layer, which is where you can blow in or release small amounts of air with a push, and the final layer, which is how you deflate. Flat valves deflate very quickly due to the large open hole, and fill up quickly.
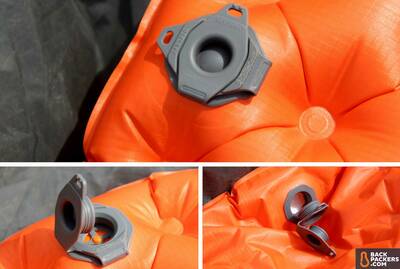
There are some variations of the flat valve, but they look like this for the most part. This flat valve has three stages: fully closed, half closed for inflation, totally open for deflation.
Finally, flat valves were designed to be used with an external system for inflation. These come in the form of a stuff sack or pump with a small unit that attaches the valve. You fill the stuff sack with air (like a balloon) with the valves attached, and press air into the pad. No more breath!
Some pads have two flat valves — one for inflation, one for deflation. This makes it very clear and easy to use your sleeping pad, and is great for beginners.
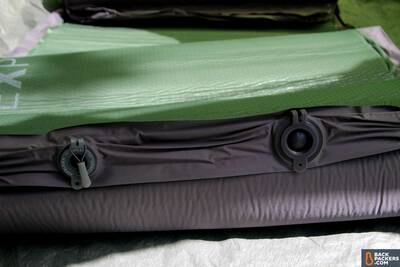
Most Exped sleeping pads have two valves, one for inflation and one for deflation. This makes setup really easy.
If we’re being honest, flat valves outperform twist and pull valves in just about every way. However, many major manufacturers still use twist and pull valves, so if you want their pads you have to deal.
Therm-a-Rest SpeedValve
We’d be remiss if we didn’t mention Therm-a-Rest’s SpeedValve technology. Basically, Therm-a-Rest does not use flat valves because they didn’t invent them. Instead, they invented the SpeedValve.
This consists of a wide, open hole at the top of the sleeping pad. You can blow into this hole from a specific distance and fill an entire pad in much less time than normal, even less time than a flat valve. This process uses Bernoulli’s Principle of fluid dynamics to work, and is very cool in theory. Watch it in action:
While SpeedValve is cool (and does work), there’s one glaring issue: user error.
Users have to be exactly six inches from the open hole to inflate a SpeedValve pad quickly. The pad has to be “completely flat”, the inside black bag also has to be completely flat, and you have to roll the remaining fabric exactly seven times. If you don’t blow correctly it will take a while to inflate (defeating the purpose), and if you don’t roll it correctly the pad will deflate overnight.
These issues mean casual users, who often don’t pay any attention to things like this, will probably blow it up incorrectly.
For the gearjunkie who wants a Therm-a-Rest sleeping pad, SpeedValve is a great technology. But flat valves and twist and pull are easier to get the hang of.
Valve Attachments
As mentioned in the flat valve section, a number of sleeping pads now have valve attachments to help with inflation. The goal here is for you to not use your breath to inflate. Why not?
For one, it takes time and is taxing. The more recent concern, though, is that breath contains moisture, and putting moist air in these pads has the potential to increase mold growth over time.
Inflating the pad without breath makes both of these issues moot.
Inflatable Stuff Sacks
The main way pads inflate through a secondary source is through inflatable stuff sacks. These have a valve attachment at the bottom that connects to the pad. You fill up the sack with air by waving it around or blowing in it, close it, and push the air into the pad.
Flat valves tend to work better with this method, but if you get a good seal on a twist and pull this will work well.
The Sea to Summit Air Stream Pump Dry Sack fits onto their unique sleeping pads. Attach it to the pad via the flat valve, fill the sack with air, and compress.
Inflatable stuff sacks area also multi-purpose: you can stuff things in them. This is great for gear organization, and some stuff sacks, like those offered by Sea to Summit, are also dry sacks.
Air Pumps
Sleeping pad air pumps range from wall plug-in pumps to tiny hand pumps, but many sleeping pad companies make a pump to do the inflating work for you. On larger sleeping pads for camping these pumps might come included.
This small hand pump from Exped allows you to top off their larger camping sleeping pads. Also attaches via flat valve.
Sleeping Pad Denier and Durability
Denier is a unit of thickness used to measure threads. Most backpacking products include a denier number, and sleeping pads are no different.
For sleeping pads, you can often equate thicker Denier to a more durable product. However, this is not always true. There are a number of things to keep in mind when it comes to sleeping pad Denier numbers and equivalent toughness:
- Polyester vs. Nylon: Companies use polyester or nylon material to construct the exterior of a sleeping pad. Polyester is thicker, more durable, and heavier, while nylon is thinner, less durable, and lighter. You’ll find lower Denier counts use polyester, and higher ones use nylon.
- Ripstop: You’ll see many different kinds of “ripstop” material used in sleeping pad spec sheets. This means the fabric is constructed to resist tearing. Ripstop is often put on the top of sleeping pads to ensure your constant use doesn’t easily rip the pad.
- Heavier Fabric on Bottom: It may be obvious, but manufacturers usually put a thicker material on the bottom of sleeping pads. The bottoms are more prone to ripping, so if you are notoriously hard on your gear, or sleep in areas with lots of rocks, look for a higher Denier number on the bottom.
Sleeping pad Denier numbers range from 20D nylon and polyester all the way to up 100D nylon. You’ll want to go by reviews to get a gauge on overall toughness of any sleeping pad, but know that anything in the 50D range will be very tough. The lighter air pads use 20D and 30D nylon fabric, which does hold up, but needs to be handled delicately.
Sleeping Pad Systems
The last major feature worth mentioning is a newer concept in the outdoor industry: sleeping pad systems. In the days of yore you’d buy a sleeping pad separately from your sleeping bag, assume the two work fabulously together, and figure out the rest at camp.
In order to create a product ecosystem, large brands have started making bags and pads that “fit” together. Big Agnes, Nemo Equipment, and others hope to entice customers into purchasing both products.
The Big Agnes Roxy Ann 15 is a bag designed to fit with a sleeping pad, as you can see by above. This works best with Big Agnes pads, of course, and completes the sleep system.
Overall we think this is a cool idea, and it’s often executed well. This usually means sleeping bags have a special insertable slot for the sleeping pad, which reduces shifting around in the night. It also means the temperature rating for sleeping bags is paired precisely with the sleeping pad R Values to provide the best overall warmth.
If you’re intent on getting a sleeping pad and bag system, go for it. However, many backpackers already have a sleeping bag, or want a very specific pad. Buying into a sleep system like this reduces choice, and we love having lots of options.
Sleeping Pad Care and Maintenance
Care and maintenance for sleeping pads is fairly easy. There are two main things to consider: how to store a sleeping pad and how to patch a sleeping pad. Assuming you don’t toss out your sleeping pad after every backpacking trip, learn these two things and you’ll be set.
How to Store a Sleeping Pad
Very few people store a sleeping pad correctly, and it greatly affects the longevity of your pad!
When not in use, sleeping pads, especially self-inflating sleeping pads, should be unrolled and left in a dry, cool room. The valve should be open.
It’s that simple. If you don’t have space for that, try to make space. For self-inflating pads, the foam assumes the shape of the form it’s in. If you keep it wrapped tight all the time, it won’t inflate as well, or last as long.
It’s not such a big deal for closed-cell foam pads or air pads — these you can store compressed, even if it’s better to leave them unrolled.
How to Patch a Sleeping Pad
The process of patching a sleeping pad is critical backpacker know-how. This can be done expertly at home, but it works in the field, too.
1. Make Sure to Have a Patch Kit On You
The first step of patching a sleeping pad is having the patches. Most sleeping pads come with patches and sealant upon purchase, so check to see if you have that.
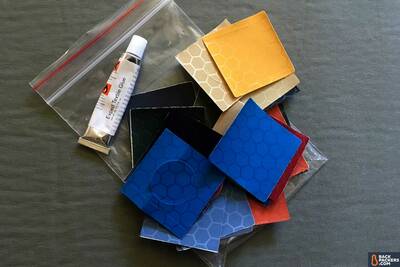
Hopefully your sleeping pad came with a patch kit. If it did, it probably looks like this. Some textile glue, small squares of fabric that match the pad, with pre-cut circular areas if you need them. You can also buy generic kits like this in stores.
If you don’t have a patch kit, you can always buy spares from the manufacturer or stores like REI. If you don’t want to patch with actual fabric, adhesive tape like Tenacious Tape is good for quick fixes.
2. Locate the Leak
This is the most difficult aspect of patching a sleeping pad. Unless you’ve torn a giant hole in your pad, the leak will probably be so minuscule you can’t see it. If that’s the case, there are a few things you can do to find it.
All of these steps assume the pad is fully inflated to start.
Listen for it: The first method to try, and one that works in the field, is to press a fully inflated pad and listen for the leak. If it’s large enough you can find it quick; if it’s really small this will be hard.
Apply soapy water to the area: If you have an idea of where the leak is, mix soap with water and splash it on the area. This works in the field, assuming you have soap and a pot to mix it in, and if you know where-ish the leak is. If the soapy water is over the hole, when you press on the pad to force air out, a soap bubble will be created.
If you have no idea where the leak could be, it isn’t very practical to cover your whole pad with soapy water in the field. You can do this at home, and likely find the leak that way.
Submerge in the tub: This method only really works at home because you don’t want to submerge your pad in a river or lake while backpacking — unless you do, then go ahead. It can be a pool, a bathtub, or any body of water. Inflate the pad, dunk all of it in the water, and try to spot the small stream of bubbles. There’s your leak, and you know where to patch.
If none of these methods work and you can’t locate the leak, you may have a faulty valve. Manufacturer warranties differ, but if you can send your pad in for assessment on the valve, it’s worth it.
3. Mark the Leak
After determining where the leak is, you’ll want to mark it for your patch. You can try to “remember” where it is, but trust us, this is harder than it seems. A sharpy typically does the trick, or a small piece of tape. You can use a pen if that’s all you have, but be careful not to poke another hole in the pad.
You’ll want to mark the leak when the pad is still inflated — and it should be inflated during the leak test.
4. Deflate the Pad
After you think you’ve found the leak and marked the spot, deflate the pad. To get a full seal you’ll want the pad to be completely flat and devoid of air.
5. Clean and Dry the Pad
Once fully deflated, you’ll want to clean the area where a leak may be. This is important. Much like putting a new sticker on your car, any dirt or debris will make the tape or adhesive less likely to bond to the pad. Clean it well.
Also make sure the pad is dry before you try to patch. Leaving most pads in the sun for a few hours will assure they are dry.
6. Apply the Adhesive and Patch
The final step is applying the adhesive and patch to the hole. If you’re using something like Tenacious Tape, just put the tape over the area you marked, blow it up, and see if has stopped deflating.
If you are using adhesive and a patch, put the adhesive over the area that’s marked on the pad, then put the patch down. Many manufacturer’s directions will instruct you to put the adhesive on the patch before you put it on the pad, but in our experience this makes the patch curl awkwardly and stick to your fingers.
So, put adhesive on the pad where the hole is, then the patch over that. Hold firmly for a few minutes, or better yet put a book on the spot and really let it bond.
7. Test It
After about 30 minutes you should be set. Re-inflate the pad and test it. Some holes are tiny and leak air slowly, so you’ll need a good amount of time lying on the pad to test this. You can also inflate it, put a heavy object on the pad, and then check to see how it’s doing in a couple hours.
Still firm? Congrats!
Still leaking? Go back to step one and look for more holes.
Backpacker Types
We’ve discussed different Backpacker Types and sleeping pads in this Guide already, but in this area we’ll lay out our general ideas for why different sleeping pads fall under different backpacker types. Unlike other gear categories, these are all pretty straightforward.
Wilderness Backpacker Sleeping Pads
The Wilderness Backpacker is really who the sleeping pad was created for. Something to lie on that’s comfortable, warm, and can be packed up. We think sleeping pads for the Wilderness Backpacker should be under two pounds, have a packed size that is around 11 x 5 inches, and be fairly durable. While self-inflating pads do work for the Wilderness Backpacker, we feel that air pads are a better option overall. They are lighter, smaller, and can be a lot more comfortable.
Ultralight Backpacker Sleeping Pads
Sleeping pad innovation has been driven by the Ultralight Backpacker. Low weight and small size are the most important things, often at the expense of durability. The only exception to this is closed-cell foam sleeping pads, which are large, but still very lightweight. These are the cheap option, if you still want a pad that’s ultralight. Otherwise, air pads are the way to go, and you’ll want an air pad that packs smaller than a Nalgene water bottle.
Car Camper Sleeping Pads
Sleeping pads for camping are all about comfort. Weight and size are not an issue, and this often means deluxe, extra-long, extra-wide, thick pads are the best. For this we recommend self-inflating pads, as they offer the most comfort when fully packed with lots of foam.
Affiliate Policy: We support the hours that go into our reviews, testing, and guides through affiliate commissions on purchases made through links in this article.

You are great!! I can’t believe that I finished reading the entire blog and feel like an expert already.
Thank you! Happy reading, and good luck grabbing a pad!
Really comprehensive a must-read for anyone looking to camp. Thank you, you’ve answered all the questions I had on sleeping pads!
Thank you!
Absolutely great information. I was educated in the best way!
Thanks Ginny! We worked hard on this one 🙂
Why were none of the egg carton brands not reviewed? They tend to be thicker, and the spaces between the “bubbles allow your sleeping bag to decompress thus keeping you warmer. Sure, most are from overseas, but so are many of the “big brands”..
Fantastic article! Well done – great insights on the history of the sleeping pad.
Best
Lars
Glad you found it to be a good read! Hopefully, this guide helped you find the right sleeping pad, but we’re here to answer questions, too!
Thanks for the information. I didn’t realize how much I didn’t know or think about a sleeping pad. Thank you as I now feel informed to buy the correct pad for me.
very clear and good article easy to understand. Thank you
Great guide and infos!
Are there specific sleeping pad recommendations for different types of camping, such as backpacking or car camping?
Hello. You can view our recommended sleeping pads for backpacking here, and out top camping mattresses here.